REFRESH YOUR OUTDOOR SPACE
Fall is a beautiful time of year, but it also signals the end of the growing season. Summer-blooming perennials have completed their blooming cycle and now perennials that bloom in late August and September bring colour and life to the garden.
If you’ve been meaning to replace a plant in your garden, this is a great time to choose a perennial or shrub that has vibrant colour. Here are a few ideas:

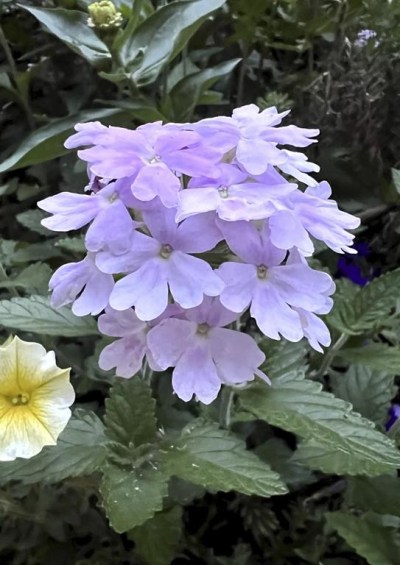
Vibrant fall colour: A Croton with mums (Colleen Zacharias / Winnipeg Free Press)
Honorine Jobert anemone is a late-season perennial with dark green leaves and pure white flowers on medium-high stems that wave gently in the wind. It is a standout in partial sun.
Heuchera Fire Alarm coral bells is a versatile perennial with beautiful red scalloped leaves that will electrify sun or shade areas of the garden. It will need more moisture in full sun areas. Just recently I switched out a tired, overgrown spirea and planted Fire Alarm in its place – what an improvement.
Empty out container gardens that are no longer working for you and create a new grouping of containers that still look lovely. Carefully remove elements that are spent or shaggy and pop a small potted mum in its place. Small potted crotons and mums can often be purchased for less than $10 each for a brilliant pop of colour.
Everything looks better when it’s tidy. Get rid of weeds and sweep away debris from your patio and pathways. Use a hose or broom to spray spider webs off your porch, outdoor lights, and other areas.
Create an autumn display. Robyn Chubey creates a stellar display in fall with pumpkins she grows at her farm, Prairie Glow Acres. In this example, Chubey lined a pathway leading to her potting shed with assorted mini-pumpkins and Jack O’Lantern pumpkins.
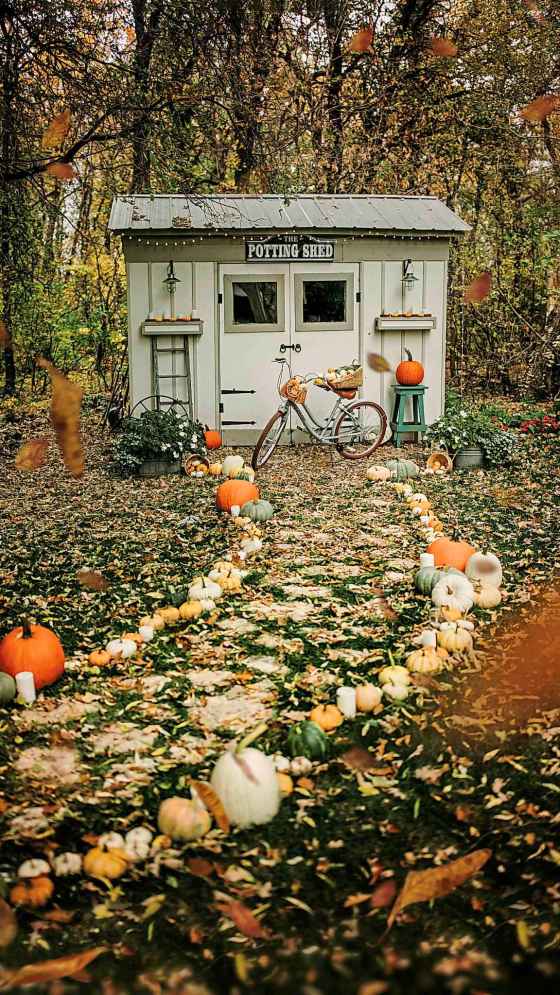
Creating a fall scene with pumpkins. (Robyn Chubey / Prairie Glow Acres)
MUST-DOS FOR EARLY FALL
Bring tropical plants indoors: Keep an eye on the weather and if nighttime temperatures begin dropping to lower than 10 C, it’s time to bring tropical plants and houseplants indoors for the winter.
Save your leaves. You may even want to save your neighbour’s leaves, if they’re headed for a yard-waste bag. Fallen leaves are packed with nutrients. A layer of leaves in garden beds provides a slow-release of nutrients for soil microbes. Do this each year and you will see and feel the difference in the texture of your soil. Healthy soil promotes healthy plants.
Adding a mulch layer of leaves around the base of tender perennials or plants that will be spending their first winter in your garden provides their root systems with an insulating layer of protection.
Protect your lawn and woody plants from vole damage. Will this be a rampant year for voles, which chew on the roots of grass and gnaw on the bark of trees and shrubs beneath the snow all winter? It’s possible. Taz Stuart, owner of Taz Pest Control, said there are a lot of mice right now, so, it’s logical to assume vole populations will be high, too.
The best time to control voles is now, before the snow falls, he said.
One option is to mow your grass to a short height. Voles prefer long grass. Another option is to place snap traps along the perimeter of your deck and fence line, as these are traditional pathways for voles. I’ve also spotted voles running along the edges of my cold frame and along the foundation of my house.
Young trees and fruit trees are especially vulnerable to damage by voles, which strip away the bark at the base of woody shrubs. Earlier this year I visited Paul Kruse and Heather Unger, owners of Northern Grove, a 40-acre permaculture homestead northeast of Winnipeg.
Kruse, an arborist, uses aluminum window screen mesh to protect fruit trees from rodent damage. Aluminum window screen mesh is a more affordable option than hardware cloth fencing. Kruse and Unger purchased 48-inch x 100 ft. rolls of aluminum window screen mesh at North End Weatherstripping. “Since the window screen mesh is aluminum, it holds its shape, so it is not necessary to secure the shape when it is applied around a tree,” says Kruse.
To apply the mesh, Kruse puts the cut end facing down to prevent it from rubbing against the tree. Kruse applied the mesh to young fruit trees and said that the expense worked out to $2.50 per tree.
Many gardeners use a layer of flax straw to add a protective layer of insulation over the winter for tender or newly planted shrubs. Voles, unfortunately, like the cozy protection of flax straw, too. It may be useful to place a wide circle of hardware cloth fencing around your shrub, taking care to secure the fencing firmly in the ground by sinking it two to three inches (5-7cm) into the ground before it freezes. Add the flax after a hard frost.
SUMMER’S CONTAINER GARDENS
Sometimes, at this time of year, we can’t wait to take apart some of our container garden designs. But there are also eye-catching designs we love and want them to continue to be lush and beautiful in our gardens for many more weeks.
Sharlene Nielsen, owner of Front Door Stories, creates many container gardens for her clients. She uses a combination of tropical plants and annuals. One client wanted something simple but dramatic for curb appeal that would also compliment the modern exterior of their new house. Nielsen created this stunning container design for full sun:

(Sharlene Nielsen / Front Door Stories)
Thrillers
- White birch branches for contrast and height
- Majesty palm for height, scale, and movement
- Canna Cannova Bronze Scarlet for bold colour and height
Fillers
- Ficus Burgundy
- Geranium Big EEZE Dark Red
- Lantana Havana Sunset
Spillers
- Petunia Bees Knees
- Tradescantia zebrina
Nielsen used a black container that is nearly a metre tall. The diameter of the planter is 50 cm. “The arrangement stands over eight feet tall,” said Nielsen. She sprayed the arrangement with Bobbex to deter the deer who live in her client’s neighbourhood.
The potting mix she uses is a combination of compost and recycled potting mix from the previous year. Nielsen applies a slow-release fertilizer at the time of planting and during the summer months she feeds her container plants with a liquid fertilizer every two weeks.
Karen Chopp, known as the Barefoot Gardener, creates seasonal container garden designs for her clients and also shared this beautiful example which she created for a client who wanted long-lasting impact and subtle colour.
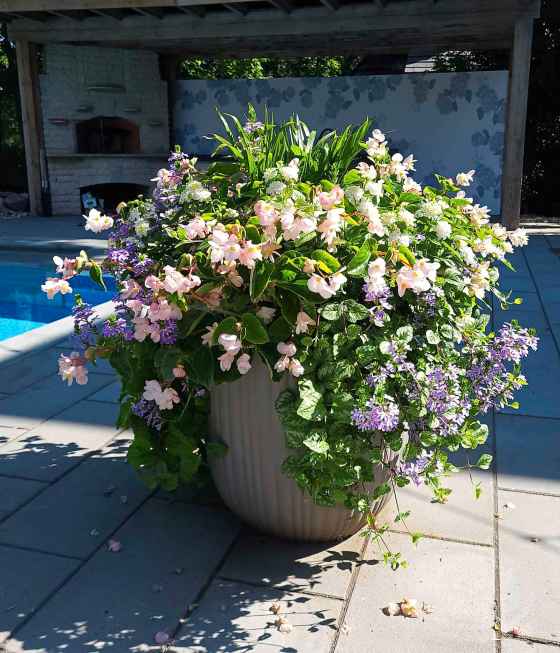
(Karen Chopp)
Chopp used a smaller-size Cat Palm, which can also be grown as a houseplant, as the focal point in her design. White Dragon Wing begonias planted around the Cat Palm fill out the display which also includes trailing plants such as purple Scaevola (fan flower), Lamiastrum Silver Nettle Vine, and Plectranthus.
“Purple Scaevola has been the star of the show with non-stop blooms,” said Chopp. “The Dragon Wing White begonias have turned a lovely shade of soft pink in full sun while remaining true white in shadier locations.”
Chopp also used Silver Nettle Vine as a trailer in full-sun containers but said that it struggled in the heat of the day. Plectranthus, though, is one of the most versatile trailing plants in sun or shade.
Chopp was also thrilled by the performance of Umbrella Sedge Papyrus (Cyperus alternifolius) which she combined with the velvety texture of Senecio candicans Angel Wings and a splash of white-flowered Lantana in a pool-side container. The plants stood up to blistering heat and full sun.
WHAT TO DO WITH USED POTTING SOIL
After emptying out my containers, I remove clumps of roots and debris from my potting mix.
If I’m confident that none of the plants that grew in the soil were infected with disease or bothered by a pest infestation, I store the soil for use next year.
One method is to place the potting mix in a large clean bin with a lid or store it in sealed plastic bags.
In spring, I add a layer of old mix to the bottom one-third of containers and top it up with fresh potting mix and compost.
GARDEN-MAKING, ONE YEAR LATER
Aimee Kornelsen is a science teacher and nature enthusiast who lives in Stonewall with her husband and two young children.
Last fall, Kornelsen replaced the lawn in her backyard with a flower garden. She marked out pathways and smothered a large grassy area with a 15- to 20-cm layer of arborist wood chips. In May, she planted 400 plants directly into the mulch layer. She used a combination of hundreds of plants started from seed in February and March along with plugs purchased from local native plant nurseries.
If you’re a regular reader of Winnipeg Gardener, you know we’ve followed Kornelsen’s garden-making journey. I asked Kornelsen what she learned as she looks back on her project one year later.
The project was easier than she thought it would be and she is glad she did the planting all at one time, she said. “The plants did very well, and the garden required only minimal weeding and far less watering than other flower beds in my yard,” said Kornelsen.
Kornelsen was surprised at how quickly native varieties such as Giant Hyssop and Wild Bergamot grew and flowered in their first year in the garden.
I asked Kornelsen if there is anything that needs some tweaking. “Last fall when I was planning my garden, most of the leaves had dropped so I didn’t realize how shaded some areas were,” she said. “I may need to move some plants around.”
Kornelsen said that Big Bluestem grass (Andropogon gerardi), a native plant, established quickly from plugs and is already sporting its distinctive turkey-foot seed heads. She discovered that she loved the globe shape of flowers in her garden and purchased some new perennials: Allium Millennium, Echinops Arctic Glow Thistle and Platinum Blue Globe Thistle. She also filled in gaps with Gaillardia Arizona Sun Blanket Flower.
Coreopsis Sunrise tickseed was one of her favourite ornamental varieties this year. The yellow semi-double blooms contrasted well with purple flowered plants and attracted plenty of pollinators. Sunrise tickseed is hardy to Zone 4. “I sure hope it comes back next year,” said Kornelsen.
Kornelsen has started planning next year’s garden and has ordered several bulbs – a snow crocus mix, Galanthus Mount Everest Snowdrops, Allium Gladiator, and Allium Blue Drumstick.
This fall she plans to water as needed but will reduce the amount of watering as plants go dormant. She also plans to top up the layer of mulch in her garden and add a little extra around tender plants after the first hard frost to protect them for the winter.
“I will leave most things standing for winter interest, insect habitat, and food for birds,” she says, “but I will deadhead prolific self-seeders like Blue Vervain (Verbena hastata).” Kornelsen grew Blue Vervain from plant plugs and the plants grew rapidly in their first summer.
“I gained a lot of satisfaction from my garden,” said Kornelsen, who set up a table in the middle of her new garden and hung a hammock nearby. “Even in the garden’s first year, the plants attracted bees and butterflies.”
TIPS FOR PLANTING LILY BULBS
The Manitoba Regional Lily Society is hosting its Fall Bulb Sale on September 30 at T&T Seeds & Garden Centre in Headingley from 9 a.m. to 3 p.m.
“Lily bulbs bought at MRLS bulb sale (or anywhere else this fall) need to be planted as soon as possible to give them enough time to start to settle in before the winter,” says Deborah Petrie, a longtime member of the MRLS. Petrie grows countless lily bulbs in her Brandon garden.
“Lily bulbs are never completely dormant, so they are ready to grow new roots as soon as you plant them,” she says. “If you can’t plant your bulbs right away, keep them in the fridge. Store them in slightly damp peat moss or vermiculite in resealable poly bags in your crisper.
“I try to get mine in the ground as fast as possible before winter sets in. The more time they have to grow roots, the better they fare next spring.”
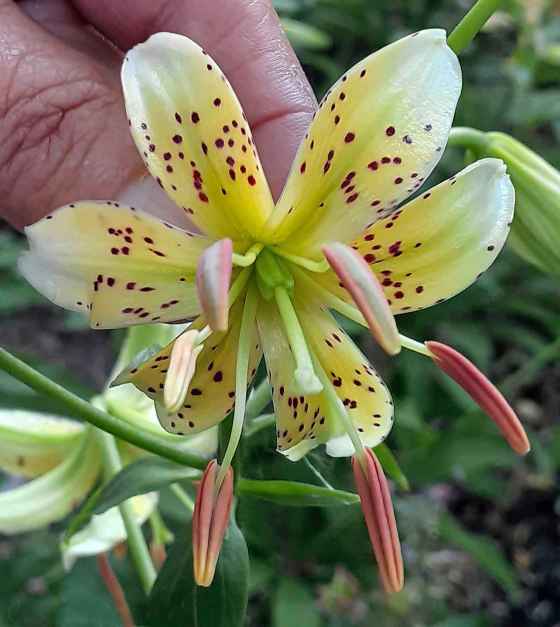
Martagon lily: Golden Green (Manitoba Regional Lily Society)
Here, Petrie shares tips for planting lily bulbs this fall:
Where to plant: Most lilies like a lot of sun (at least six hours). Martagon lilies, though, tolerate various degrees of shade including deep shade.
Sandy loam soil is best for lilies, but with some amendments of compost, peat moss and well-aged or well-composted manure, even heavy soil can be made ready for planting.
Fresh manure can burn lily bulbs, so be cautious and use it as a top-dressing only. Whatever the location and type of soil, keep in mind that lilies do not like wet feet. Soil must be well-drained, or the bulbs could rot.
How to plant: Most lily bulbs should be planted to a depth of 15 cm and at least 30 cm apart. Oriental Trumpet crosses (OT’s) and other interdivisional lily cultivars such as Asiatic x Oriental (AO) hybrid lilies, Oriental Asiatic (OA), and Longiflorum Oriental (LO) should be planted to a depth of 20 cm to protect them from our cold winters.
Plant your bulbs with the roots down and the pointed end facing up. Bone meal can be added to the planting hole.
Cover the bulbs with your garden soil and make sure to pack it down well. Give them plenty of water to prevent any air pockets from remaining around the bulbs.
No mulching is necessary for Asiatic lilies and LA hybrids (a cross between longiforum lilies and Asiatic hybrids) but the more tender interdivisional cultivars and species bulbs will benefit greatly from a layer of mulch at least 10-15 cm deep to protect them over winter.
Last but not least: Remember to label your lilies so you know their names and where to expect them to emerge next spring.
BUMPER CROP OF APRICOTS
The orchard at Sustainable South Osborne Community Co-op this year produced a bumper harvest of fruit. This was the first year that the apricot trees at SSOCC produced a big crop.
SSOCC has two types of apricot trees: Manchurian Apricot (Prunus Mandshurica), which is native to Manchuria and Korea; and Westcot Apricot (Prunus x Westcot), a hardy Prairie cultivar which was developed at the Morden Research Station and introduced in 1982.
Mathew Scammell, president of SSOCC, says that of the two varieties, Westcot Apricot produced the most bountiful harvest. “The apricots were larger and juicier with a delicious taste,” said Scammell.
So plentiful was the harvest that Scammell brought in close to 30 pounds of apricots daily when fruit production was at its peak!

Westcot Apricot tree (Mathew Scammell / Sustainable South Osborne Community Co-op)
PRICEY PEONIES
Itoh peonies, known as intersectional peonies, are a cross between an herbaceous peony and a tree peony. The Itoh peony produces huge double flowers up to 20 cm across and has a sturdier habit which does not require staking.
Itoh peonies have always cost more than herbaceous peonies, however this year I noticed big variations in the price of Itoh varieties. Some varieties were priced over $100 —even as high as $170!
For a better understanding of why some varieties are so expensive, I reached out to the Prairie Peony Society (PPS), a non-profit organization in Saskatchewan. Since 2010, PPS president Myra Froc and her husband have grown more than 80 Itoh peony varieties in their garden.
“All the French intersectionals have become quite rare,” said Froc, and are fetching high prices these days. French-bred Itoh hybrid type peonies such as Belle Toulousaine, Caroline Constabel, Duchesse de Lorraine, Danse du Feu, and Soleil d’Ambre typically sell for $100 to $250.
But there are bargains: Bartzella Itoh peony, which was introduced by American breeder Roger Anderson in 1994, usually costs around $60. Bartzella was an American Peony Society grand champion in 2002. Bartzella peony has outstanding form in the garden, with semi-double to double, pastel yellow flowers 15 to 20 cm in diameter.
“The inside centre of the blossoms must have a splash of red or it’s not a Bartzella peony. A mature Bartzella will have 50 or more blossoms in a good year. In 2023, Bartzella was listed in the U.S. for around $40,” Froc said.

Bartzella Itoh peony (Myra Froc)
Incredibly, Bartzella’s original price was $1000-plus per root, said Froc. “So the rare intersectionals are fetching the higher prices while the others that have been on the market for a long time are not,” she added.
Improvements have been made in the yellow Itoh category, she said, and there are now yellow Itoh varieties with much fuller flowers than Bartzella such as Duchesse de Lorraine, Sonoma Yedo, and Sonoma Halo — however they cost more.
Solaris Farms, a specialty nursery in Wisconsin that is exclusively focused on hybridizing hardy northern peonies, sells intersectional, herbaceous, and tree peonies for a reasonable price to their U.S. customers, she said, however, Canadian retailers must sell those same peonies at a much higher price due to exchange rates.
Itoh peony series like Sonoma (Yedo, Halo) are selling at high prices, said Froc, because of their multiple grand champion wins at American peony shows over the last two years.
“On the other hand, Dutch growers are selling small intersectional roots very cheaply, if you buy five to 10 roots of the same cultivar at once.”
The Frocs purchased Itoh roots last year from growers in the Netherlands and paid 25 to 35 Euro ($37 to $51) each. If retailers are getting their Itoh peony stock from the Netherlands, the prices consumers pay should be more affordable, said Froc.
“I think the exchange rate is what is killing the Canadian retailers right now,” said Froc, “however, shipping is not that much of an issue for Canadian retailers these days because of the special business rates available from Canada Post and courier companies.”
Plant exchanges and plant sales offered by horticultural societies and garden clubs are a gardener’s best friend because they offer affordable prices for a range of plant varieties.
The Prairie Plant Society will have a peony root sale on Sept. 30 at Victoria Square Mall in Regina. “We will also be selling leftover roots online via our PPS Facebook page but purchasers would have to pay for postal shipping costs of $20 for a box of two roots,” said Froc. “This is a service we provide to our distant PPS members and other interested peony gardeners.”
Tips for planting peony roots: Fall is the ideal time to plant peony roots. Froc recommends digging a hole slightly deeper to allow the addition of a balanced fertilizer such as 10-10-10 and a handful of bone meal. Mix well and water deeply.
Plant the Itoh crown and its buds 5 cm below the soil surface. Herbaceous peony crowns should be planted 4 cm below the soil surface. Apply a layer of mulch after the soil freezes, then gently remove the mulch in the spring.
HYDRANGEA TREE-FORMS
One of the advantages of Hydrangea tree-forms, also referred to as tree standards, is that they are small trees that bring height to the garden while leaving plenty of room for underplanting.
The most suitable species of Hydrangea for cultivating into tree-form is Hydrangea paniculata. Limelight, Quick Fire, and Vanilla Strawberry tree-forms are available each year at nurseries in limited quantities.
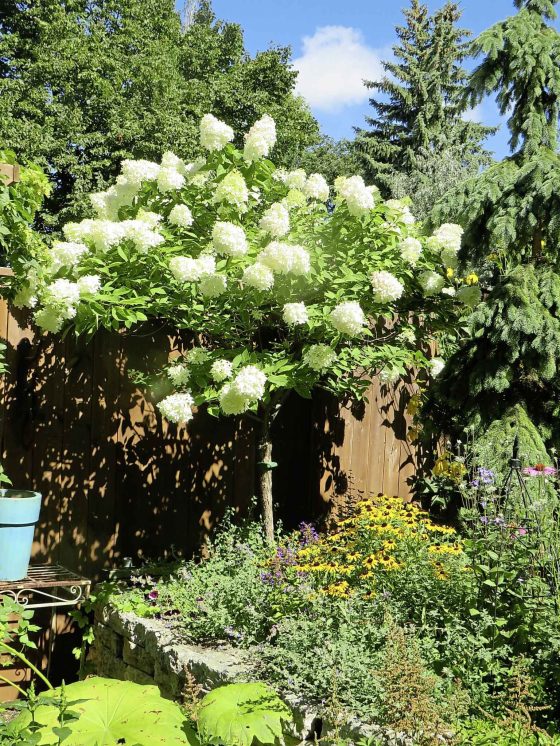
A Limelight Hydrangea tree-form (Colleen Zacharias / Winnipeg Free Press)
I asked Garth Aubin, inventory management and logistics at Aubin Nursery, a wholesale nursery grower in Carman, about the process that the nursery industry uses to shape hydrangea shrubs into trees.
“They are extremely time-consuming to graft,” he said. “It is a process of training the shrub into a tree. It is an art form. Finding a perfectly straight leader on a shrub isn’t realistic so the ’tree’ stem can be brought in by nurseries from Holland and budwood is grafted onto this. This also involves a lot of pruning and staking.”
I grow Limelight and Quick Fire tree-forms in my garden, some of them more than 10 years old. A wind-protected area is best.
I use a tree-watering bag to water my hydrangea trees during hot, dry periods. Tree-watering bags slowly release water directly to the root zone of small trees. In winter, I apply tree wrap to the slender trunk of the tree-form to protect it against vole or rabbit damage.
Sheldon’s Roasted Tomato Marinara
Soprano Lara Ciekiewicz has performed in numerous title roles and is also a voice instructor with the Desautels Faculty of Music at the University of Manitoba. She grows an abundance of tomatoes in her River Heights garden and shares this delicious recipe for homemade roasted tomato marinara:
- 5 lbs tomatoes (any type, washed, unpeeled, rough chopped)
- 3 Tbsp olive oil
- 6 garlic cloves, peeled, and rough chopped (local is better)
- 2 tbsp anchovy paste
- 1 tbsp balsamic vinegar
- 1 tbsp dry oregano
- 1 tbsp dry basil
- 1 tsp kosher salt
- 1 tsp (black pepper
- 1/2 tsp pepper flakes (optional)
Combine all ingredients in a large, enamelled Dutch oven. Roast at 425 F for 60 minutes, stirring at the halfway mark.
Blend. An immersion blender should be all you need.
If sauce is too watery, reduce on stovetop until desired consistency is reached.
Use immediately or freeze for later use.
COPPER VS SLUGS
Ken Dunsmore and Cathy Shearer have a passion for growing hostas in their south Winnipeg garden. They have been collecting unique varieties and increasing their collection through division for many years. One of their favourite varieties is Hosta Rainforest Sunrise, which has foliage with radiant golden centres and dark green edges.
They haven’t had a problem with slugs in the past, but this year when slugs began chewing holes in their hostas, they looked for a non-toxic solution. Since slugs are known to not like the feel of copper, Ken and Cathy decided to place some copper wire mesh around the base of their hostas.
They purchased a roll of Copper Blocker at Lee Valley Tools for $22.50. It’s a pure copper wire mesh that comes in five-inch wide rolls in 25-foot or 100ft lengths.
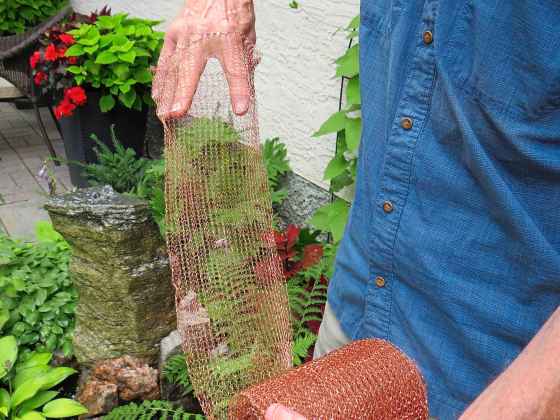
Ken Dunsmore unrolls copper mesh used to deter slugs (Colleen Zacharias / Winnipeg Free Press)
The copper mesh comes in a sleeve. Ken cut it to length with scissors, opened the mesh, wrapped it around the base of hosta plants and secured the mesh in place simply by pushing the ends together.
It worked. When I checked with Cathy recently, she was pleased to report that slug damage has been minimal.
HOLLOW POTATOES
John Guttormson planted about 15 hills of potatoes this year and has noticed that many of the potatoes he grew are too large and are hollow in the centre.
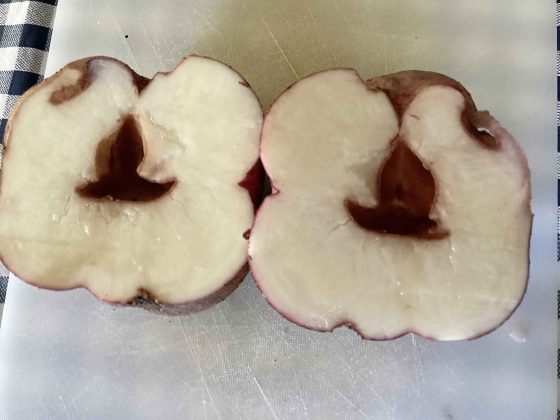
A potato with a hollow heart. (John Guttormson)
It’s possible for hollow heart to occur if there is herbicide residue in the soil, however, potatoes are a moisture-sensitive crop and it is important to maintain even soil moisture throughout the growing season. The growing season this year has been a challenging one in terms of reliable precipitation together with wildly fluctuating temperatures.
Applying a layer of straw or mulch around potato plants during the period of active growth helps to keep the soil cool and moist. Once flowers appear on the plants, apply one to two inches of water weekly. A moisture sensor is very helpful in determining how moist or dry the soil is. Insert the probe of the meter to root level.
When potatoes grow too large, it may be due to spacing or excess nitrogen. Close row spacing (15 to 20 cm) is recommended to limit oversize tubers. Potatoes, a cool season crop, are considered heavy feeders. Phosphorus and potassium play important roles in tuber production but nitrogen, less so.
Amending soil with yearly additions of mineral- and microbe-rich compost increases soil fertility, but fertilizer applications may also be required.
TAMING A BEAST
I first saw a neatly pruned Ninebark (Physocarpus) shrub on a garden visit last summer and was struck by its beautiful form in the landscape. I planted Summer Wine Black Ninebark in my garden several years ago because I was so taken by its dramatic, dark foliage. Backlit by the sun, the foliage glows.
But it had grown into a beast. Either I pruned it or dug it up. Typically it is not recommended to prune Ninebark cultivars that have arching branches because pruning would destroy their natural shape, but Summer Wine Black Ninebark has strongly upright stems. I felt confident it was a suitable candidate for some remedial pruning.

Pruning a Summer Wine Black Ninebark (Colleen Zacharias / Winnipeg Free Press)
This spring, using pruning shears, I began shaping my Ninebark by gradually reducing its height. I also removed older growth at ground level to thin the shrub and promote good air circulation, which is essential as Ninebark shrubs are sometimes prone to powdery mildew. I maintained a neat appearance with an occasional trimming to the upper canopy during the summer.
Leggy, free-ranging branches are now leafy and dense. With its overall size reduced, Summer Wine Black Ninebark no longer overwhelms neighbouring plants — Hydrangea Quick Fire tree, Rudbeckia, Russian Sage, and Grape Leaf fall anemone — and the handsome dark foliage provides rich colour contrast.
EMERGENCY PLANT BANDAGE
One day in early August, I paused for a moment to look at a courtyard area in my front garden. It struck me that something was missing, but what? Then I realized that my 180-cm Lavender Mist Meadow Rue (Thalictrum rochebruneanum) was lying on the ground. The tiny buds on slender stems were just days away from opening.
A squirrel or rabbit had bitten partially into the outer protective layer of the stem near the bottom of the plant. The “skin” flap about 10 cm long was still attached. I felt the plant had a chance at survival because the animal had not bitten into the core of the stem which contains the vascular tissues.
I stood the plant up carefully and gently lifted the outer flap of loose stem over the wound. Since I didn’t have any grafting tape handy to secure the loose flap in place, I used the next best thing: kitchen plastic wrap.
The plastic wrap was soon replaced with self-adhesive parafilm grafting tape for a tighter fit. Four weeks later and the Meadow Rue’s stem is fully upright without any signs of weakness and the delicate spray of tiny mauve buds flowered right on schedule.
Your questions, answered
Have a question for a gardening expert? Reply to this email with your question and we’ll seek answers from some of Manitoba’s most knowledgeable gardeners. If you’re asking about a problem with a plant or pest, please attach a photo to help our experts diagnose the issue.
Question: I have a fairly young Monstera plant. It was gifted to me by a friend who propagated her larger Monstera. This is my first time caring for this type of plant. I’ve had it for almost a month now and it doesn’t look like it is thriving.
I understand Monsteras like indirect sunlight, and probably only need to be watered once a week or when the top layers of the soil are dry. It likes humidity to a degree.
I kept this all in mind, but my plant still looks sad. It started to droop, leaves are curling, and one of them turned yellow.
I have no idea how to revive this. I understand this can happen from overwatering, but I only do it once a week — every seven days or a bit over. But the soil is never really that dry. Is the soil not draining enough? Does the plant need to be repotted?
I also don’t understand the roots. Why are some upright? They should all be in the soil, right? This is how my friend gave it to me.
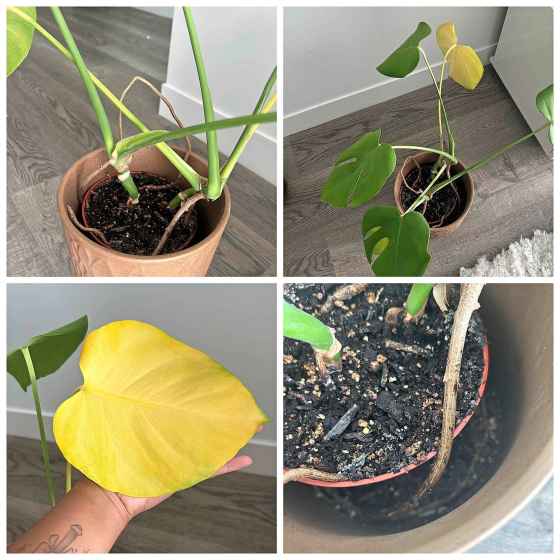
Caitlin’s monstera has a yellowing leaf and aeroil roots that take in water from the air. (Supplied)
Please help me! I really don’t want to give up on this plant.
—Caitlin
Answer: Congratulations on your new plant adventure, Caitlin. Let’s get you on the right track to a happy, healthy plant.
While you have the light specifications correct for the Monstera Deliciosa; from what I can tell you are struggling with the watering requirements. Yellowing and limp leaves is a general indicator of overwatering.
When we look at plants, we must gauge their anatomy for forms of natural water storage. For example: compare a fern to a monstera.
A fern has thin brittle leaves, stems and fibrous roots. Thus no points for natural water storage, and a fern requires watering once the topsoil begins to dry.
Monsteras have glossy leaves, thick stems and roots and aeroil roots (the ones that point up) — they help in absorbing water from its surrounding environment. That adds up to four points of water storage, and means we should let the soil try out 80%.
For a six-inch diameter pot, this takes around two weeks within a typical home.
I would suggest feeling within the soil for moisture. If you feel any, wait an additional four days and repeat. Water thoroughly once it feels dry.
Allowing the soil to dry forces the roots to stretch and search for water within the soil, strengthening them.
—Nicky Shaw, Waterer, Retail Greenhouse Care at Shelmerdine Garden Center
Question: Every year I buy asters started from my favourite greenhouse. The plants are healthy, I have a huge pot and they start out growing well, they reach about a foot in height, and then they start to turn yellow and sickly.
I have managed to save two plants out of a dozen, and one is blooming nicely, foliage is a nice dark green. The rest look like they are about to die. The asters pictured were once healthy plants, growing nicely.
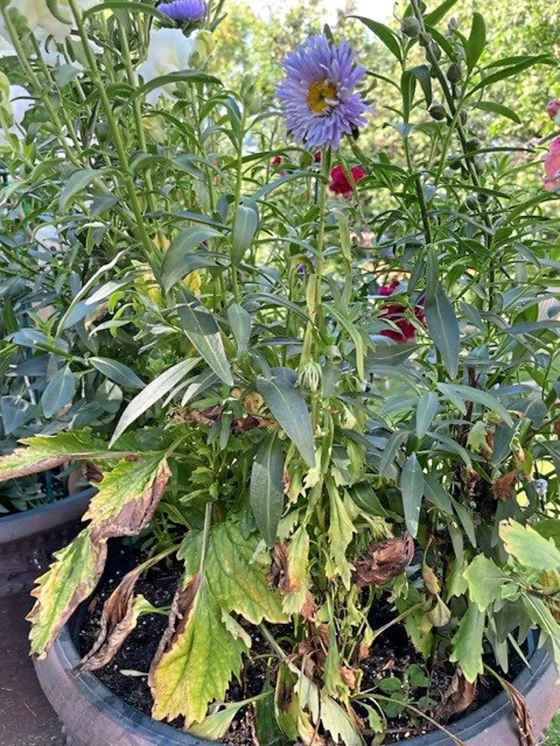
Donna’s asters aren’t faring well. (Supplied)
Am I overwatering? There are no bugs on them. This has been going on for years now. I completely remove all soil from pots and start new every year.
—Donna
Answer: Since you are buying new asters each year and growing them in pots with fresh potting mix, the answer to what is troubling your plants may be a combination of problems working together.
The photos you provided show that the leaves near the bottom of your asters are a light green with dark veins, but the leaves are also necrotic, meaning that they have turned brown and withered.
Asters, including container-grown asters, can be susceptible to a plant disease called aster yellows. That was my first thought, except that the flowers on your plants do not appear distorted, which is another symptom of aster yellows.
Asters can also be affected by fusarium wilt, which is a fungal disease that infests the soil. Lower leaves also develop a pale green colour before drying up. Affected plants as well as the potting soil which harbors pathogens should be removed and discarded. Do not add the soil to your garden beds or compost.
The next step is to sterilize your containers to remove any pathogens that may survive the winter. Start by washing your containers with warm, soapy water. Rinse, and allow to dry thoroughly. Then wipe down your containers with a 10 percent bleach solution (one part bleach with nine parts water). Wear gloves. Dispose of the leftover bleach by pouring it down your kitchen drain.
Store the containers in a clean, dry place. Next year, when you buy new aster plants, fill your sterilized containers as you usually do with fresh potting mix.
Often the recommendation is to water outdoor container gardens daily. But watering daily is not always necessary for some plants. Asters, for example, prefer well-drained soil.
A good rule of thumb is to apply water directly to the root zone. Avoid leaf splash and maintain even soil moisture but allow the soil surface to dry somewhat between waterings. Inserting a moisture meter sensor into the soil helps to take the guesswork out of when to water. Place your potted asters where they will not receive any overhead watering.
Asters benefit from good drainage and plenty of air circulation. Sometimes pots have only one drainage hole which is not always adequate. A drill bit can be used to add an extra drainage hole to a plastic pot. Drainage holes can be added to ceramic pots by using a carbide-tipped bit.
I hope this answer proves helpful. Let us know how your asters do next year!
—Colleen
Question: Can you identify these white flowers with purple on the inside. The city planted these in their planters on Moray Street and no one dead heads them. They are beautiful and lush and smaller than petunias, although they look like them. I’d like to plant them next year.
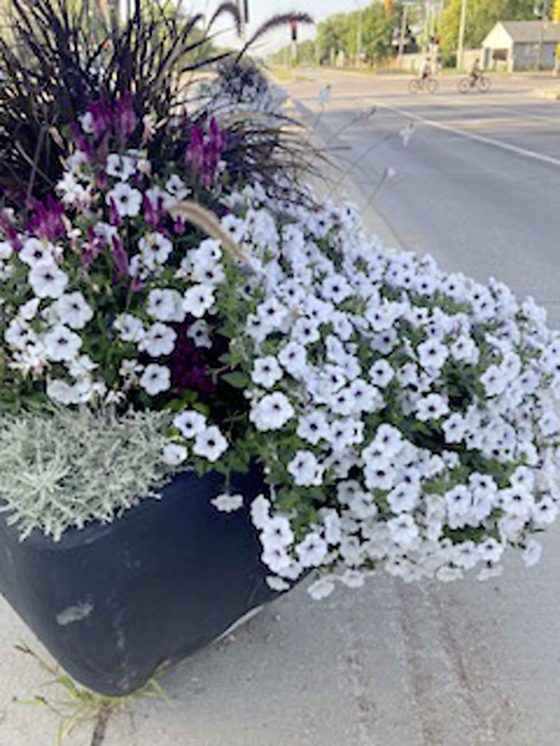
Diane will be looking for Silver Tidal Wave Petunias next spring. (Supplied)
—Diane
Answer: City of Winnipeg gardeners identified the plant that you admired as Silver Tidal Wave Petunia.
A vigorous rapidly spreading annual, Silver Tidal Wave has silvery-white flowers with dark centres and is an ideal choice for large containers. It bounces back after rainfall. Give it some support and it will grow upwards like a vine, or plant it in the ground as a low hedge or dense annual groundcover. Silver Tidal Wave is an All-America Selections winner. Hummingbirds like it, too.
—Colleen
MARK YOUR CALENDARS
Tree Canada’s National Tree Day planting event: Sept. 20, 3 to 5 p.m. at Buhler Recreation Park, 135 Murdoch Street in Winnipeg. Volunteers will learn how to plant and care for urban trees. Tree Canada experts and volunteers will be there to provide support and answer your tree questions. Gloves and shovels will also be provided! See their site for details.
Manitoba Regional Lily Society hosts its annual Fall Lily Bulb Sale on Sept. 30 at T&T Seeds & Garden Centre, 7724 Roblin Blvd, Headingley, from 9 a.m. to 3 p.m. A wide range of lilies will be available including species lilies, Asiatics, and more. Cash, cheque, or e-transfers accepted. Online ordering will also be available through the MRLS Facebook page.
Fall Releaf Sale: On Oct. 7, Trees Winnipeg will host its annual Fall Releaf with up to 300 trees available for purchase. Time and location to be decided. To reserve your tree package, visit treeswinnipeg.org
On Sept. 10, Sustainable South Osborne Community Co-op will hosts its annual Harvest Dinner in the South Osborne Community Orchard, Baltimore Road and Churchill Drive. Join Chef Ben Kramer for a hyperlocal cuisine journey to celebrate another year of growth, community, and food. Drinks and garden tour at 4 p.m., dinner at 5 p.m. under the tent. Live Latin music by Trio Bembe. Tickets are $105. Visit chefbenkramer.com.
|