Zero-waste cooking
How to work with food scraps and get more bang for your buck
Advertisement
Read this article for free:
or
Already have an account? Log in here »
To continue reading, please subscribe:

Digital Subscription
One year of digital access for only $205*
- Enjoy unlimited reading on winnipegfreepress.com
- Read the E-Edition, our digital replica newspaper
- Access News Break, our award-winning app
- Play interactive puzzles
*First annual payment billed as $205.00 + GST for one year. This annual subscription will automatically renew at $233.00 + GST every 52 weeks (10% off the regular annual price of $259.35). Offer available to new and qualified returning subscribers only. Cancel any time.
To continue reading, please subscribe:
Add Free Press access to your Brandon Sun subscription for only an additional
$1 for the first 4 weeks*
- Enjoy unlimited reading on winnipegfreepress.com
- Read the E-Edition, our digital replica newspaper
- Access News Break, our award-winning app
- Play interactive puzzles
*Your next Brandon Sun subscription payment will increase by $1.00 and you will be charged $17.95 plus GST for four weeks. After four weeks, your payment will increase to $24.95 plus GST every four weeks.
Read unlimited articles for free today:
or
Already have an account? Log in here »
Hey there, time traveller!
This article was published 29/12/2018 (2765 days ago), so information in it may no longer be current.
It’s not looking good for your grocery bill in the coming year.

It’s always a trick, managing household food costs. Many of us have a variety of strategies we employ, from buying in bulk, to studying the flyers for sales, to being flexible with our lists to stock up when we stumble across a genuine bargain. That’s the first part of getting the most for your dollar. The second part comes when we cook with an eye to managing food waste.
You might already be a pretty savvy shopper. The question is: are you also a savvy cook?
With January just a few days away, bringing with it those inevitable, but tough-to-keep resolutions, there’s one that will pay off immediately, both financially and healthfully.
Resolve to use everything you buy.
This isn’t about using leftovers. You already know how to do that. It’s about using what you’ve been discarding in the first place: cores, leaves, stems, peels and other plant parts. We’ve been throwing them out because no one has taught us that they’re edible. (And don’t forget all the bones and bits of meat that can be turned into broths for soups and stews.)

Cooking With Scraps: Turn Your Peels, Cores, Rinds, and Stems into Delicious Meals by Lindsay-Jean Hard (Workman Publishing, 216 pp, $29.99) is an A-to-Z guidebook to the edible things you’ve been tossing. You’ll find more of Hard’s past work here: food52.com/users/78236-lindsay-jean-hard.
So what are a few examples of retrievable food?
Apple cores (syrup), beet greens (sautéed with butter), cauliflower cores (purées), chard stems (roasted), used coffee grounds (incorporated into cashew butter), pineapple peel and core (lemonade), radish tops (salads and soups).
Hard is creative in her use of these overlooked ingredients. And she wants cooks to be as well. She encourages cooks to experiment with her recipes, adjusting for their own tastes. It’s a good way to dive in, because once you get a handle on one recipe, for say, using banana peels in a cake, the reader can be a little more fearless in trying that same ingredient a different way. It’s a practical skill — think about it — if you’re paying per kilogram for a whole apple but throwing away the core (say, 10 per cent of the weight), you’re actually paying more per kilogram for the edible part. Why not reduce that margin as much as you can?
Hard also says that she’s chosen food scraps to salvage that make the effort worthwhile: for example, peeling ginger won’t give you enough scraps to make anything. She also gives tips for gathering up enough of an item for use (freeze apple cores until you have enough for the apple syrup recipe).
And what do you do when you’ve done everything you can and there is still scrap? You compost it, and Hard offers tips on that, too.
These recipes make use of apple cores, chard stems and Parmesan rind and are excerpted with permission from the publisher from Cooking with Scraps by Lindsay-Jean Hard (Workman Publishing. Copyright © 2018. Photographs by Penny de los Santos).
Danish Pancakes with Apple Core Syrup

Serves 4
These pancakes are thin — more like crepes than what some would consider pancakes. Because of my family’s partly Danish heritage, they’re what I grew up with, so these are “regular” pancakes to me.
My paternal grandmother — I called her G.G. — would always spread the leftover pancakes with butter (all the way to the edges!), generously sprinkle them with cinnamon sugar, roll them up and leave them on the counter for people to slice bites off of — you should, too.
For the syrup
Cores from 5 to 7 apples (and peels, unless you’re using them to make chips), no need to remove the seeds
250 ml (1 cup) granulated sugar
125 ml (1/2 cup) lightly packed light or dark brown sugar
For the pancakes
10 ml (2 tsp) apple cider vinegar
500 ml (2 cups) milk (I typically use 2 per cent or whole, but anything other than skim is fine — even non-dairy milks)
4 large eggs
60 ml (1/4 cup) unsalted butter, melted and cooled slightly, plus more for greasing the skillet and for serving
250 ml (1 cup) all-purpose flour
10 ml (2 tsp) baking soda
5 ml (1 tsp) baking powder
2 ml (1/4 tsp) fine-grain sea salt (I do a pinch of salt and a pinch of sugar, but feel free to measure if you’d rather)
2 ml (1/4 tsp) granulated sugar
Confectioner’s sugar or cinnamon sugar, for garnish (optional)
To make the syrup: Place the cores (and peels, if using), the granulated sugar and the brown sugar in a medium-size saucepan with 250 ml (1 cup) water. Bring the mixture to a boil over medium-high heat, then reduce the heat and allow the mixture to simmer, stirring occasionally until the cores are softened and the syrup smells fragrant, 20 to 30 minutes.
Strain out the cores and return the syrup to the pan to keep it warm with the residual heat until you’re ready to eat. If you’d like it to be thicker, bring it back up to a boil, then reduce the heat and allow the mixture to simmer until it is reduced and thickened to your liking.
To make the pancakes: Meanwhile, place the vinegar and milk in a small bowl and leave it alone for 10 minutes or so — it will curdle in this time.
Add the eggs and melted butter to the milk and vinegar mixture in the small bowl and whisk together.
Whisk together the flour, baking soda, baking powder, sea salt and granulated sugar in a medium-size bowl.
Whisk the wet ingredients into the dry ingredients until combined; the batter will be very thin.
Grease a griddle or cast-iron skillet with a small amount of butter, pour in roughly 80 ml (1/3 cup) of the batter for each pancake and cook the pancakes over moderate heat. Depending on the size of your pan and how much batter you use per pancake, you might only be able to cook one pancake at a time, as the batter spreads quickly. (I use the largest skillet I have and eyeball the amount of batter needed to make a large pancake that fills most of the skillet.) When you see bubbles on the top and the bottom is golden or light brown, flip the pancake and finish cooking.
Repeat step 7 with all of the remaining batter. Serve immediately: Toss a pancake on someone’s plate, smear it with butter, and drizzle with apple core syrup. Dust with confectioner’s sugar, if using.
Roasted Swiss Chard Stems with a Creamy Sesame Dressing
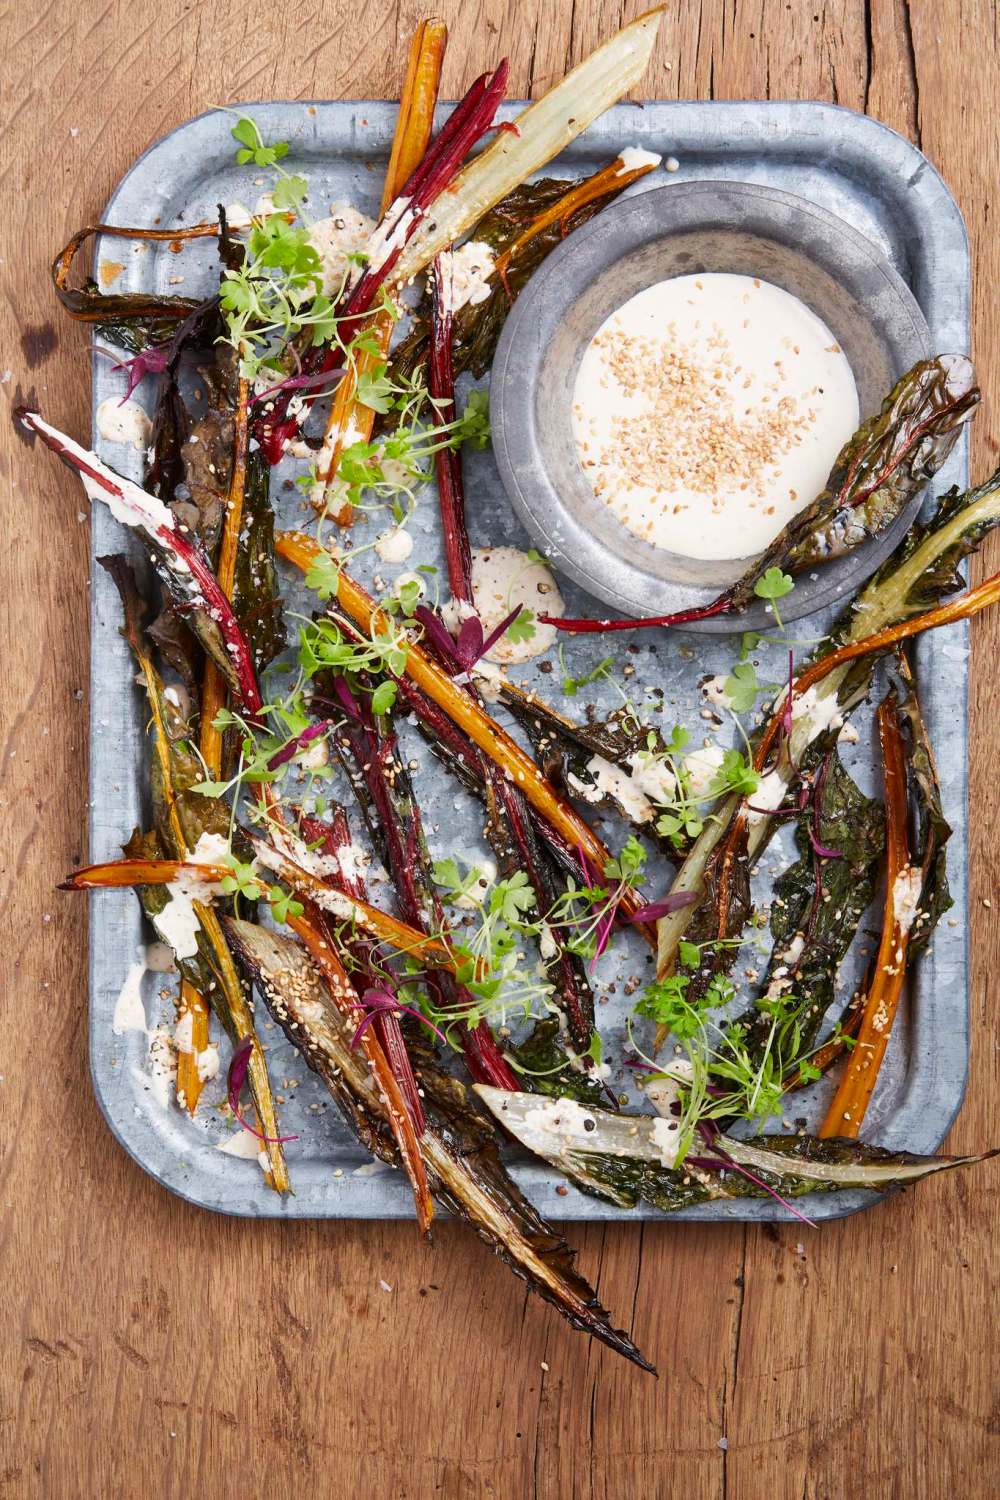
Makes a side dish for 2 to 4
My introduction to eating chard stems was through Kristen Miglore’s Genius Recipe column on Food52. She shared chef and restaurateur Anna Klinger’s recipe for Grilled Swiss Chard Stems with Anchovy Vinaigrette, and I was besotted with the idea of a recipe centred around a produce part that you’re typically instructed to remove and discard. I loved the idea of eating chard stems cloaked in sauce, but wanted to streamline the prep, opting to forgo Anna’s blanching and grilling in favour of just roasting and drizzling with an Asian-inspired dressing. Any leftover dressing can be stored separately in the fridge for three to five days.
30 ml (2 tbsp) sesame seeds, toasted; plus more for garnish (optional)
10 ml (2 tsp) rice vinegar
1/2 teaspoon mirin
1/2 teaspoon toasted sesame oil
7 ml (11/2 tsp) soy sauce
30 ml (2 tbsp) mayonnaise
7 ml (11/2 tsp) Greek yogurt
Stems from 1 large bunch Swiss chard
Extra virgin olive oil
Freshly ground black pepper
Preheat the oven to 220 C (425 F).
Crush the toasted sesame seeds with a spice grinder or a mortar and pestle.
In a small bowl, whisk together the sesame seeds, rice vinegar, mirin, sesame oil, soy sauce, mayonnaise and yogurt and set aside.
Cut the chard stems into 121/2-to-15 centimetre (5- to 6-inch) lengths, place them on a baking sheet, and drizzle them with a little olive oil. Gently toss them together to get the stems evenly coated. Spread out into a single layer and lightly sprinkle with pepper.
Roast the stems until the centres are tender when pierced with a knife, the edges are starting to char and any lingering leaf pieces crisp up like kale chips, seven to 10 minutes.
Divide the roasted stems among plates, drizzle with the sesame dressing and sprinkle with the remaining toasted sesame seeds, if using. Serve hot.
Brothy Beans with Roasted Garlic and Parmesan Rind
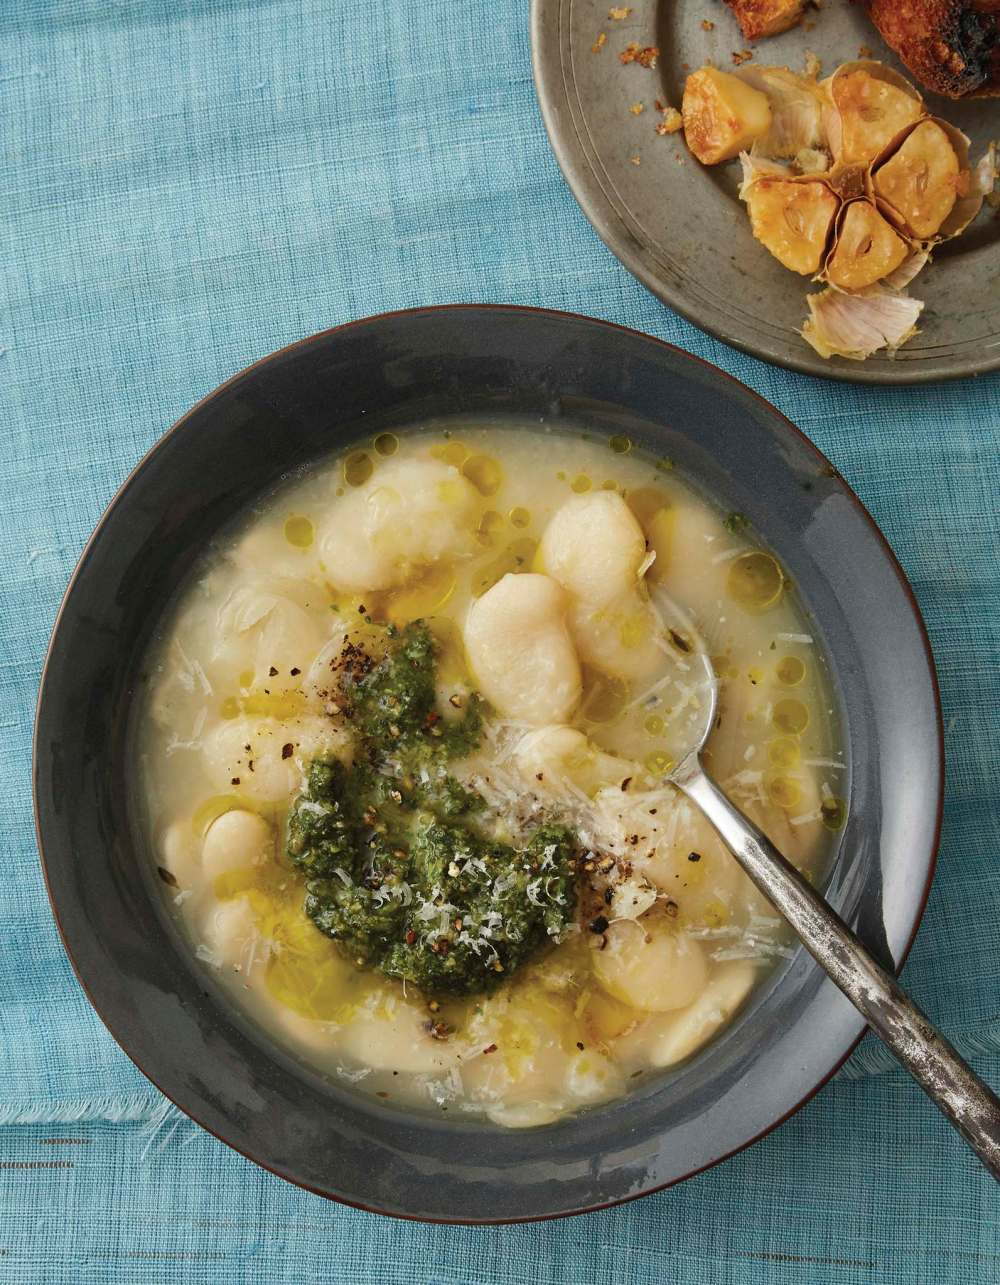
Serves 6 to 8 as a side dish
These brothy beans are inspired by a recipe that Food52 co-founder Merrill Stubbs makes — they’re a stripped-down, vegetarian take on hers. The shorter ingredient list is offset by a couple of slightly fussy steps, but that — along with really good dried beans — is what keeps this dish from being basic, boring beans. Serve them as is, or make them a meal by topping them with a poached egg and some greens.
454 g (1 lb) dry white beans, soaked (I try to soak them for two to four hours — it will speed up their cooking time and help them cook more evenly. Soaking isn’t essential if the timing doesn’t work with your schedule; they’ll just take longer to cook in step 4).
2 heads garlic
Extra virgin olive oil
1 medium-size white onion, peeled, halved and root end just barely trimmed so the layers remain together
1 Parmesan rind
3 sprigs thyme
13 ml (21/2 tsp) fine-grain sea salt
5 ml (1 tsp) apple cider vinegar or white wine vinegar
Freshly ground black pepper, for serving
Freshly grated Parmesan cheese, for garnish (optional)
Slices of crusty bread, for serving (optional)
Place the beans in a large pot and add 2 litres (8 cups) water.
Preheat the oven to 190 C (375 F). Slice each head of garlic in half horizontally and discard most of the papery outer covering (you want the heads to remain intact). Put the heads back together, set each one on a small piece of aluminum foil, and drizzle with olive oil. Wrap the aluminum foil up around each head to seal it into a packet. Bake until the garlic cloves are soft, around 40 minutes. Set aside to cool. Turn off the oven.
The beans will have expanded after soaking, so make sure they’re still covered by the soaking water, but not by very much. Add the onion halves, Parmesan rind, and thyme to the pot and bring to a boil over medium-high heat; keep at a boil for 10 minutes. Then partially cover the pot and reduce the heat to keep the beans at a gentle simmer — medium or medium-low heat, depending on your stovetop. If the water level drops below the beans, add hot water from a teakettle to just barely cover them again — don’t add too much!
Cook until tender — as little as 40 minutes or as much as three hours. It’s important to go by taste, because bean freshness, size and soaking can affect cooking time. Once the beans are tender, remove and discard the Parmesan rind and thyme stems. Remove the onion halves and place them in a tall narrow container. Squeeze in the garlic cloves from one of the roasted heads, and purée using an immersion blender. (A mini food processor would also work.)
Add the garlic and onion puree to the pot of beans along with the salt and vinegar. Taste and adjust seasonings as necessary. Ladle the beans into bowls and garnish each with black pepper, grated Parmesan and a scoop of pesto, if desired. Serve with bread smeared with the remaining roasted garlic.
Twitter: @WendyKinginWpg