Ace the face You don’t have to be a pro to creatively make over your mug this Halloween
Read this article for free:
or
Already have an account? Log in here »
To continue reading, please subscribe:

Digital Subscription
One year of digital access for only $205*
- Enjoy unlimited reading on winnipegfreepress.com
- Read the E-Edition, our digital replica newspaper
- Access News Break, our award-winning app
- Play interactive puzzles
*First annual payment billed as $205.00 + GST for one year. This annual subscription will automatically renew at $233.00 + GST every 52 weeks (10% off the regular annual price of $259.35). Offer available to new and qualified returning subscribers only. Cancel any time.
To continue reading, please subscribe:
Add Free Press access to your Brandon Sun subscription for only an additional
$1 for the first 4 weeks*
- Enjoy unlimited reading on winnipegfreepress.com
- Read the E-Edition, our digital replica newspaper
- Access News Break, our award-winning app
- Play interactive puzzles
*Your next Brandon Sun subscription payment will increase by $1.00 and you will be charged $17.95 plus GST for four weeks. After four weeks, your payment will increase to $24.95 plus GST every four weeks.
Read unlimited articles for free today:
or
Already have an account? Log in here »
Hey there, time traveller!
This article was published 13/10/2023 (1017 days ago), so information in it may no longer be current.
Whether you’re trick-or-treating, heading out to a party or planning a visit to a haunted house, get into the spirit this spooky season with these three easy Halloween looks created by Winnipeg makeup artist Maddy Harms.
No fancy face paints or pricey makeup palettes? Not to worry.
Harms says staples such as eyeliner pens, brown eyeshadow and liquid lipsticks can all be great substitutes.
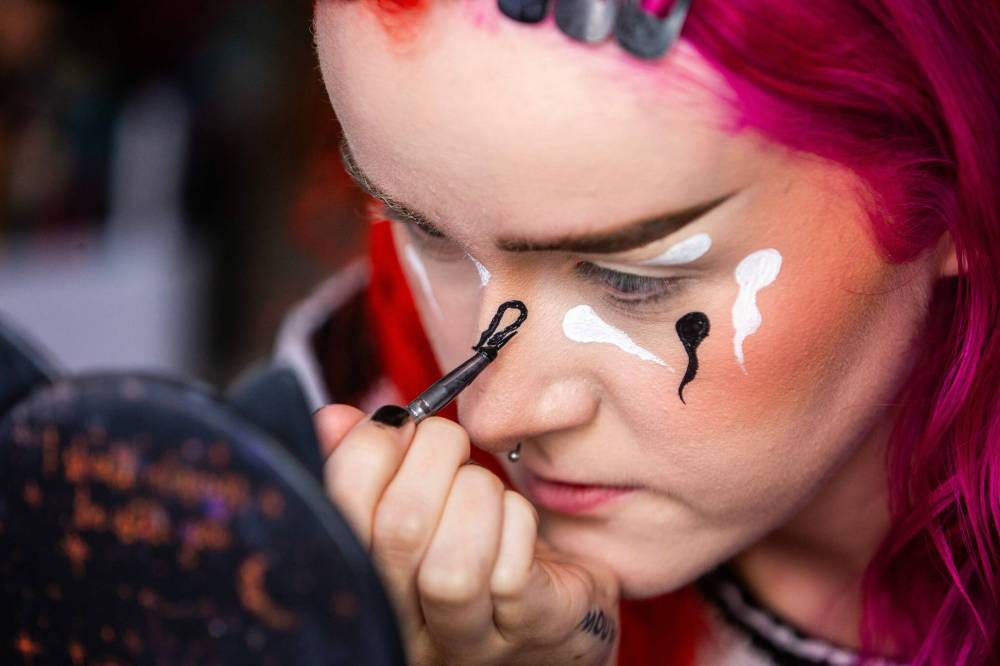
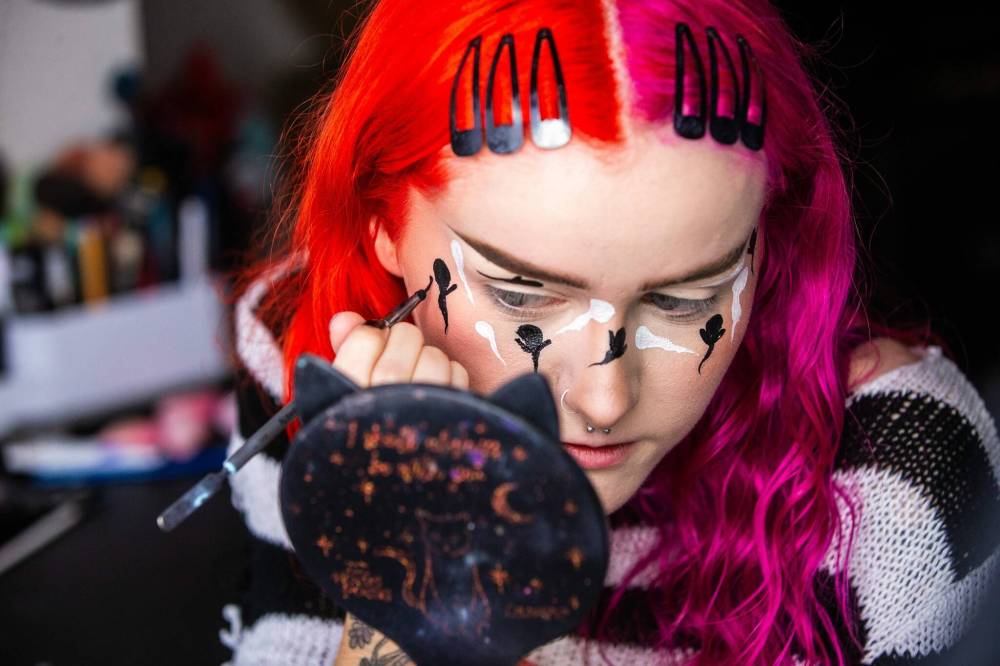
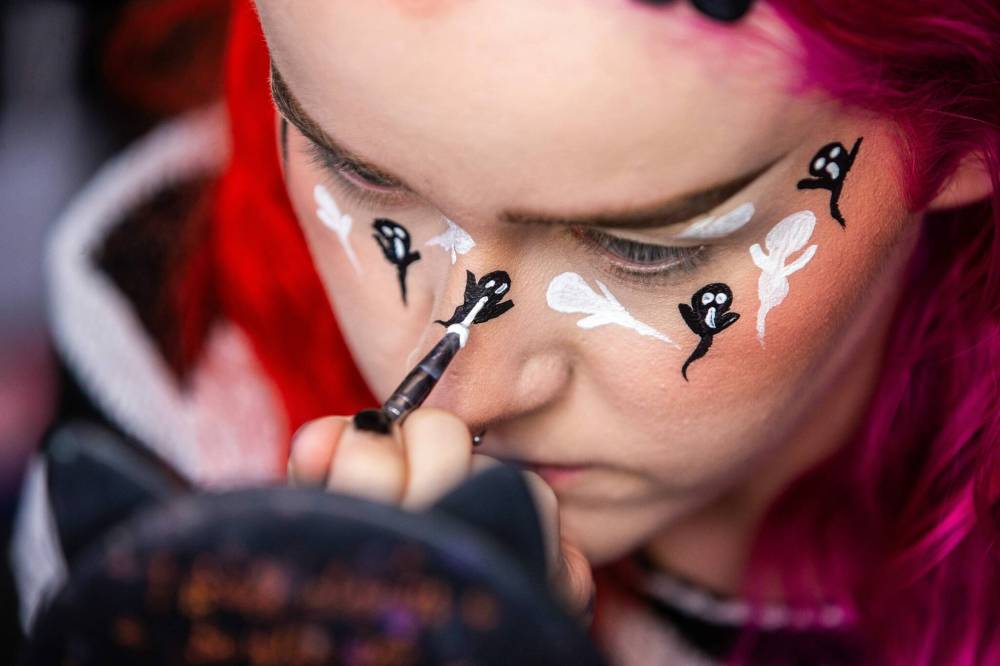
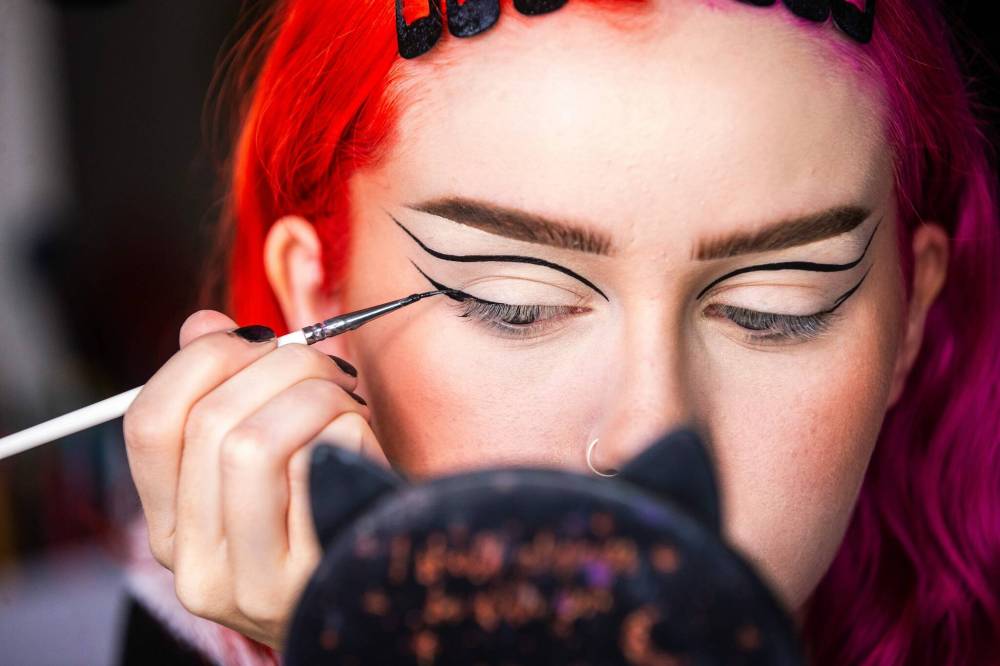
MIKAELA MACKENZIE / WINNIPEG FREE PRESS Maddy Harms demonstrates a ghost Halloween make-up look.
“The most important thing to remember is don’t be afraid to try something you’ve never done before,” she says. “Have fun with it, be creative. This is the best time to get out of your comfort zone and become a character that you love. Be sure to practise the makeup a couple times before the event you’re attending so you know exactly how to do it. You’ll be surprised at your own talents.”
Harms, 24, has been playing with makeup since she was a teenager. She is currently posting 31 days of Halloween looks on her Instagram, @maddys.makeup.
“I love Halloween because it’s a great way for me to express myself creatively. My room is Halloween-themed all year round. I also love watching horror movies because SFX makeup really intrigues me and it’s a line of work that I would love to work in,” she says.
This year Harms will be transforming herself into Gene Simmons from the band Kiss. Her mother, Shannon, will be accompanying her as bandmate Paul Stanley. Along with doing her own makeup and her mother’s, Harms will also be helping friends with their looks.
And when it comes to removing all that makeup after the festivities, the artist says to ditch the wet wipes and invest in a balm.
“My secret weapon for removing any type of Halloween makeup is a cleansing balm. I use the Farmacy Clearly Clean Cleansing Balm; it’s my favourite one on the market. It breaks down any type of cream makeup, waterproof makeup, you name it. It’s also very gentle on the skin, cruelty-free and vegan.”
Look 1: Ghosts
Difficulty rating: 2 skulls
Maddy says: Make sure you have a steady hand — that’s the most important part. The ghost outline doesn’t have to be perfect.
You will need:
● Fine-bristled brushes (craft or paintbrushes from Michaels)
● Black and white face paints or liquid eyeliner (you can also use orange, purple and green paints)
● Bowl or glass of water to clean your brushes (if using a brush)
● Paper towel to dab off excess water
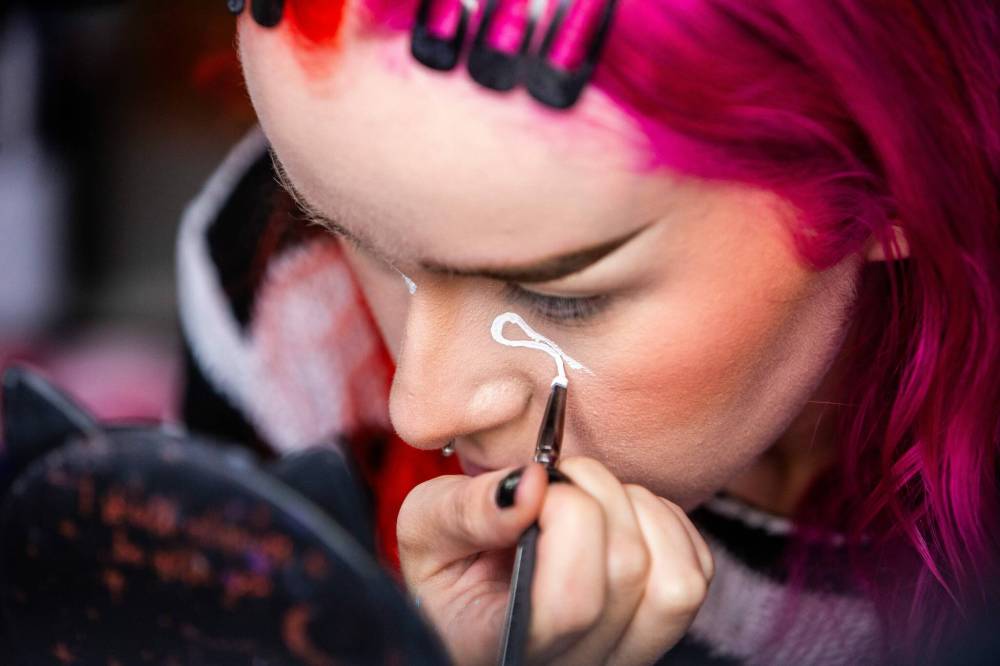
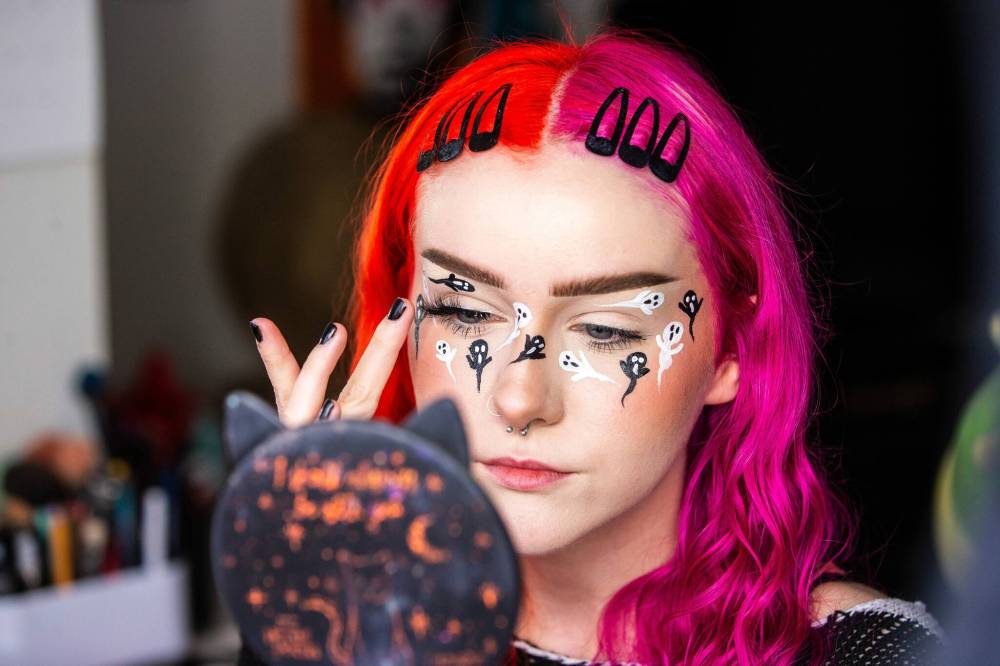
1. Create an outline of the ghost by drawing a teardrop shape with liquid eyeliner or the fine-bristled brush.
Start with the head so it looks like you’re drawing an oval before squiggling your brush down to draw a tail. Try to do it in one move so the line flows. You can use black or white to draw the outlines.
2. Fill in the black outline with black paint (or eyeliner) and the white outline with white paint or eyeliner.
3. Draw arms on either side of the ghost’s body, making sure to fill them in with the corresponding colour.
4. Using a clean brush, draw two dots on the ghost’s head for the eyes, and an oval shape for the mouth. Use white for a black ghost and black on a white ghost.
5. Apply mascara on your upper and lower lashes.
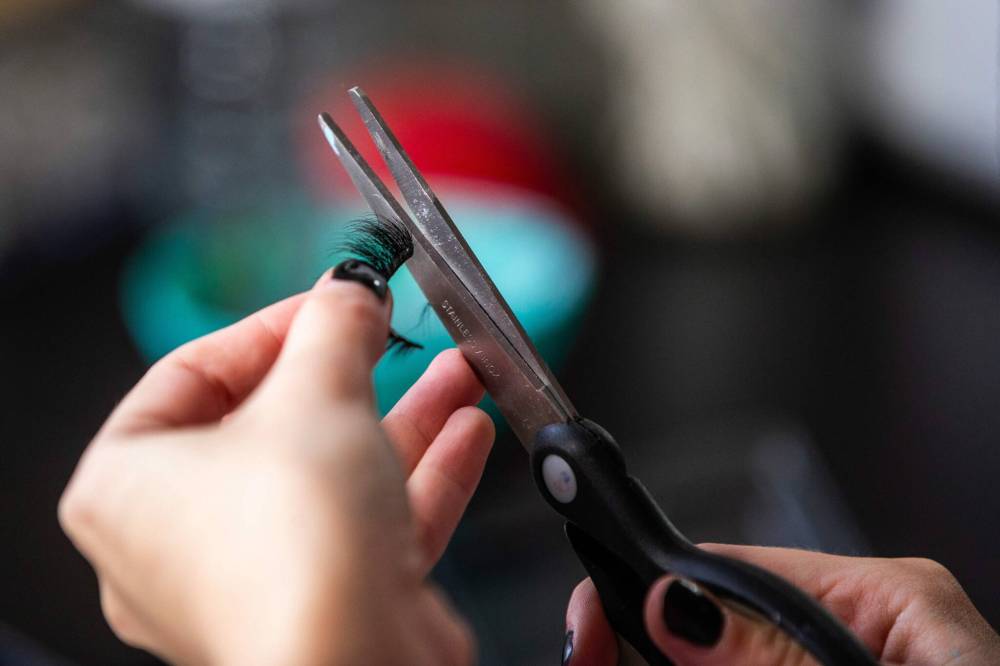
OPTIONAL: Accentuate the ghost design by applying false lashes. You may have to trim them to fit your eyes.
Look 2: Spiderwebs
Difficulty rating: 3 skulls
MIKAELA MACKENZIE / WINNIPEG FREE PRESS Spiderwebs require precision lines using a fine-bristled brush.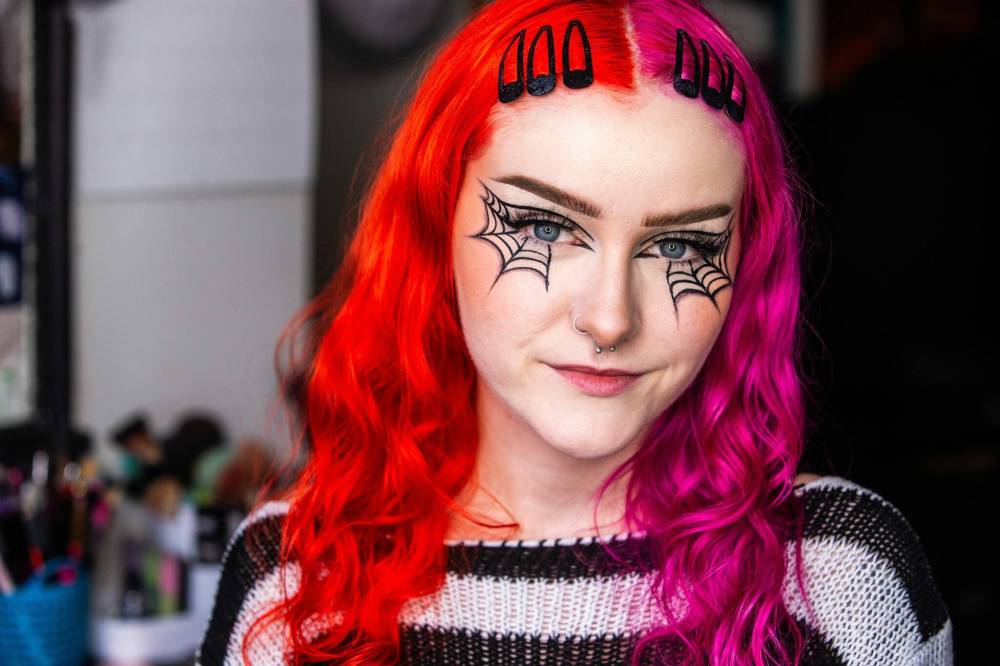
Maddy says: This requires a steadier hand and the lines need to be precise.
You will need:
Fine-bristled brushes (craft or paintbrushes from Michaels)
Black face paint or black liquid eyeliner
Black or grey eyeshadow
Bowl or glass of water to clean your brush (if using a brush)
Paper towel to dab off excess water
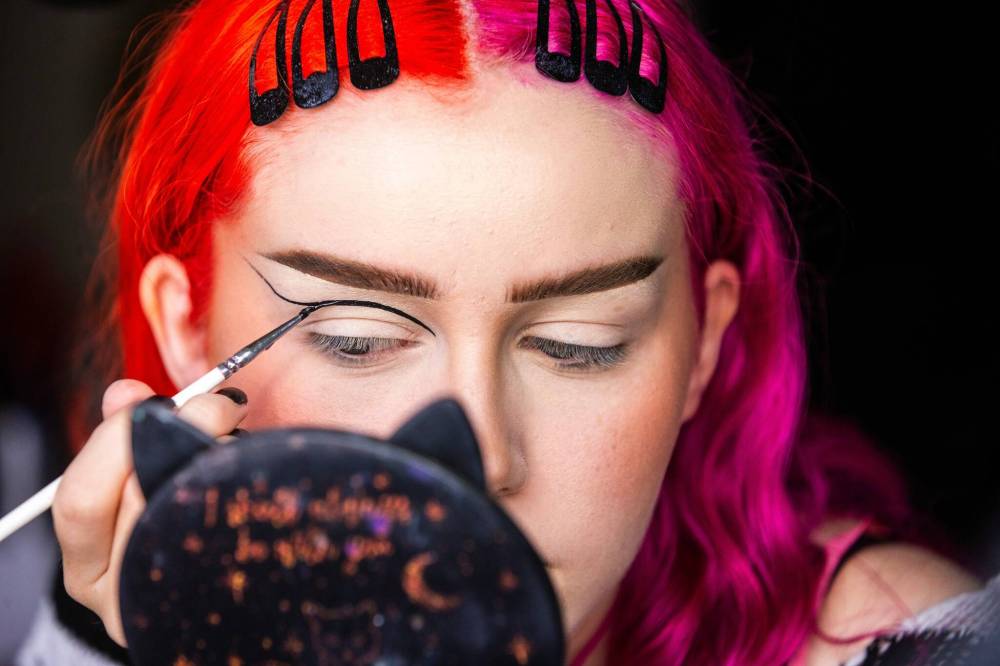
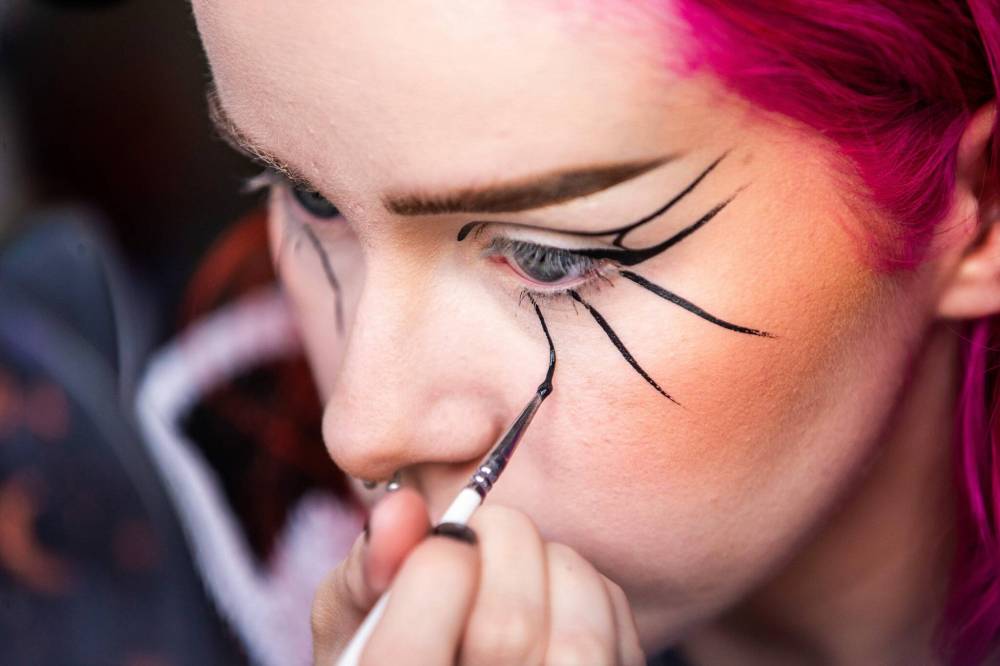
1. Using a graphic black eyeliner pencil, draw a line on the ridge of your brow (the area above the eyelid and below the eyebrow) to follow the contour of your eye, swooping upwards towards the end of the line. You must be able to see the line when your eyes are wide open. Repeat this step on your other eye.
2. Find the outer corner of your eye and, from your lower lashline, draw a line towards the upper corner of the line you’ve drawn on the ridge of your brow. Repeat this step on your other eye.
3. Carefully join the top line (on the brow) to the outer corner eyeliner with half-moon or small C-shape. Repeat on the other eye.
4. Draw three lines under each eye, stopping just above where your nostril ends. Repeat under the other eye.
5. Build your spiderwebs! Using the same half-moon/small C-shape, fill in the spaces between the lines, increasing the size and curvature of the line as you go down your face.
6. Draw a small triangle in the inner corner of both eyes.
7. Using black or grey eyeshadow, gently shade under the half-moon shapes on the outer part of the web.
8. Carefully apply mascara to finish.
OPTIONAL: False lashes can be applied.
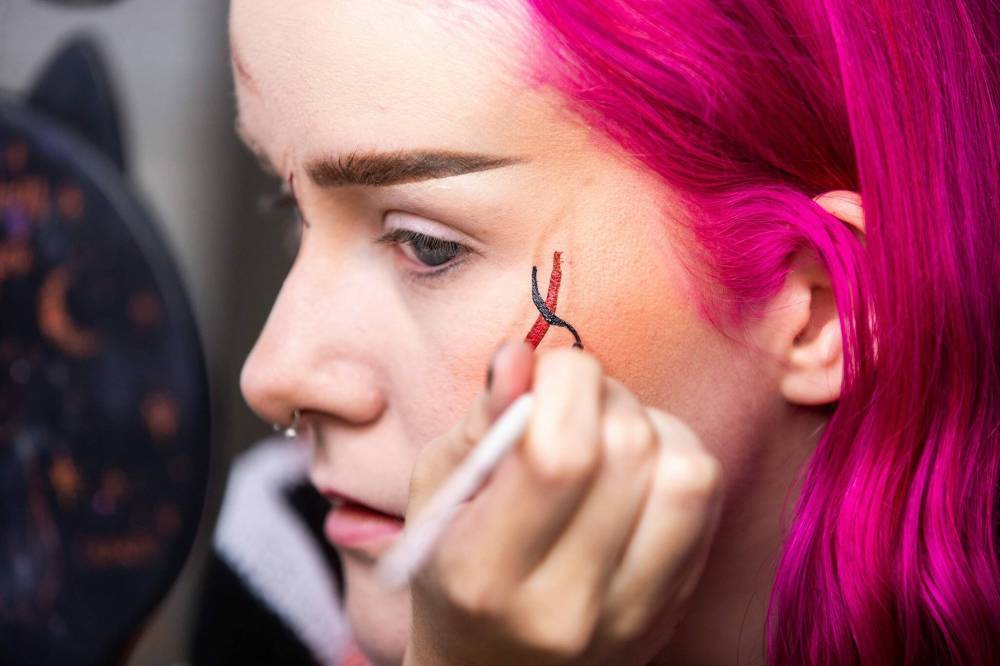
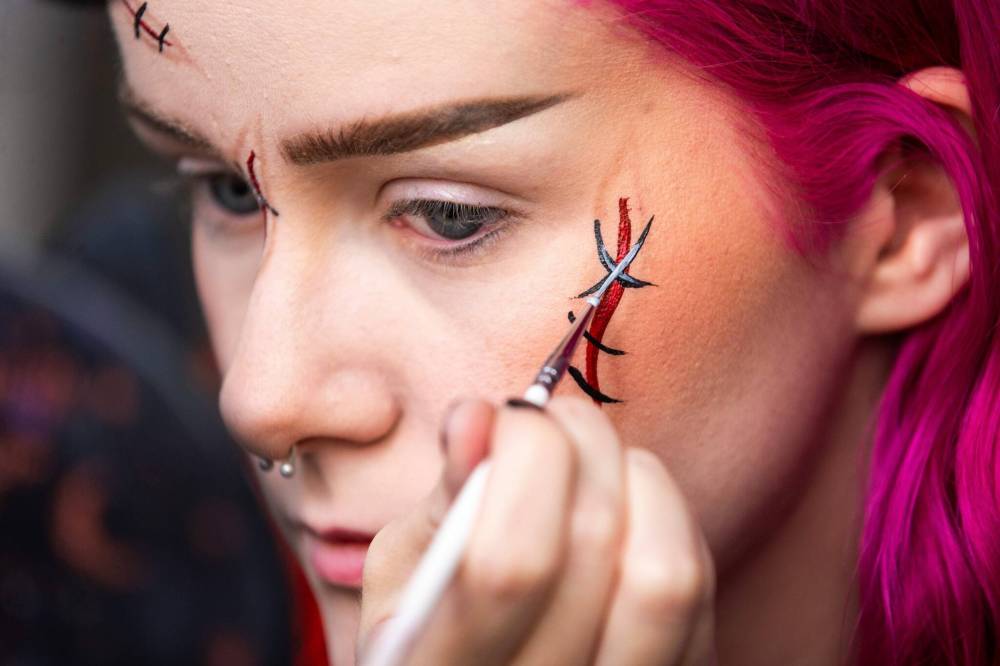
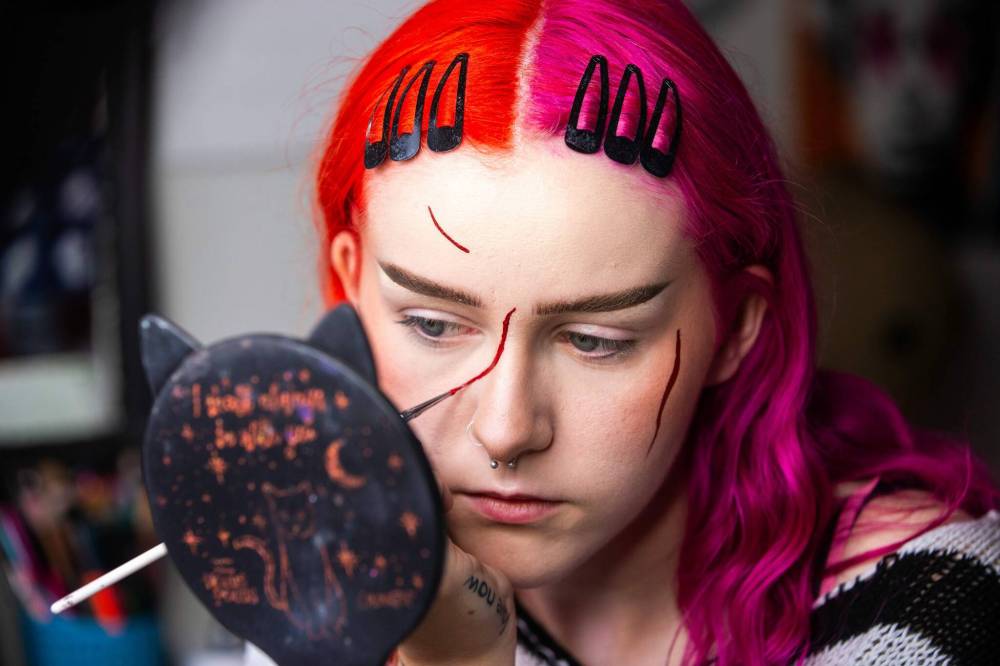
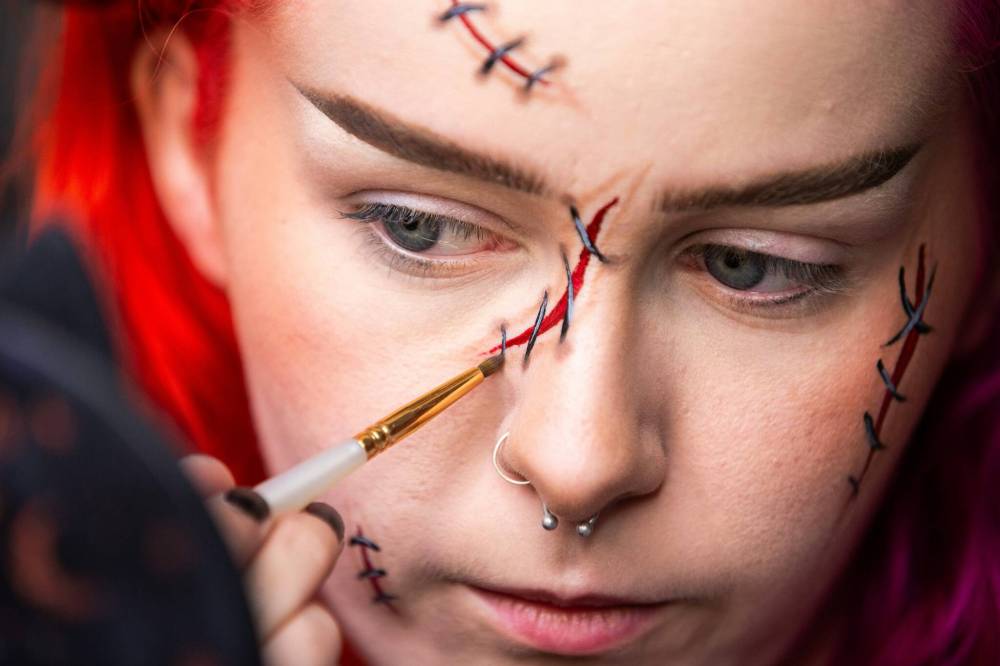
Look 3: Stitches (The base is very important for this look)
Difficulty rating: 5 SKULLS
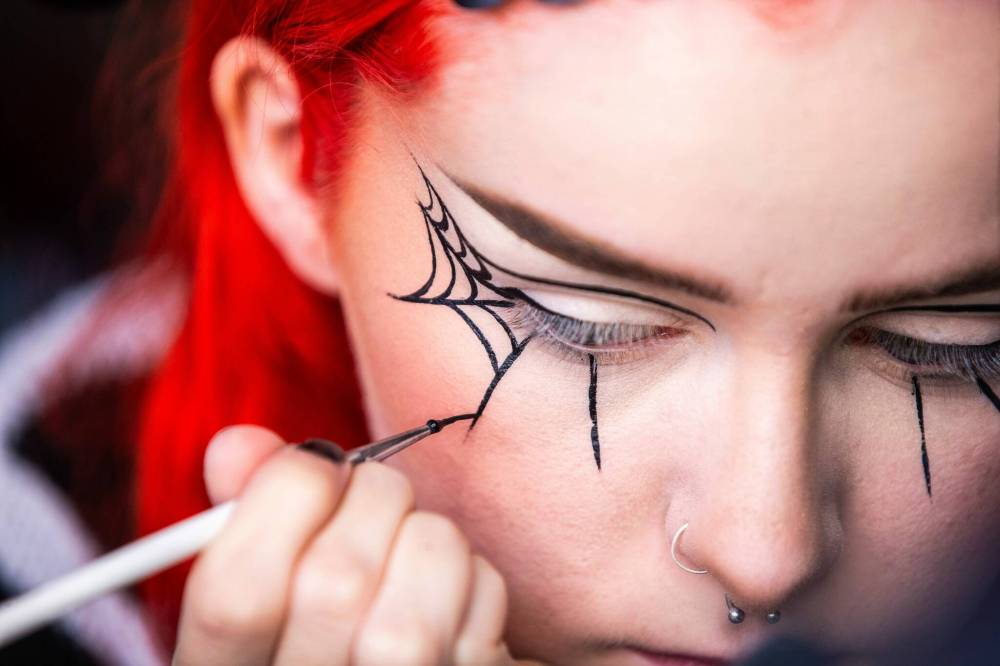
MIKAELA MACKENZIE / WINNIPEG FREE PRESS Faux wounds and stitches can be difficult to draw, but the results can look realistic. 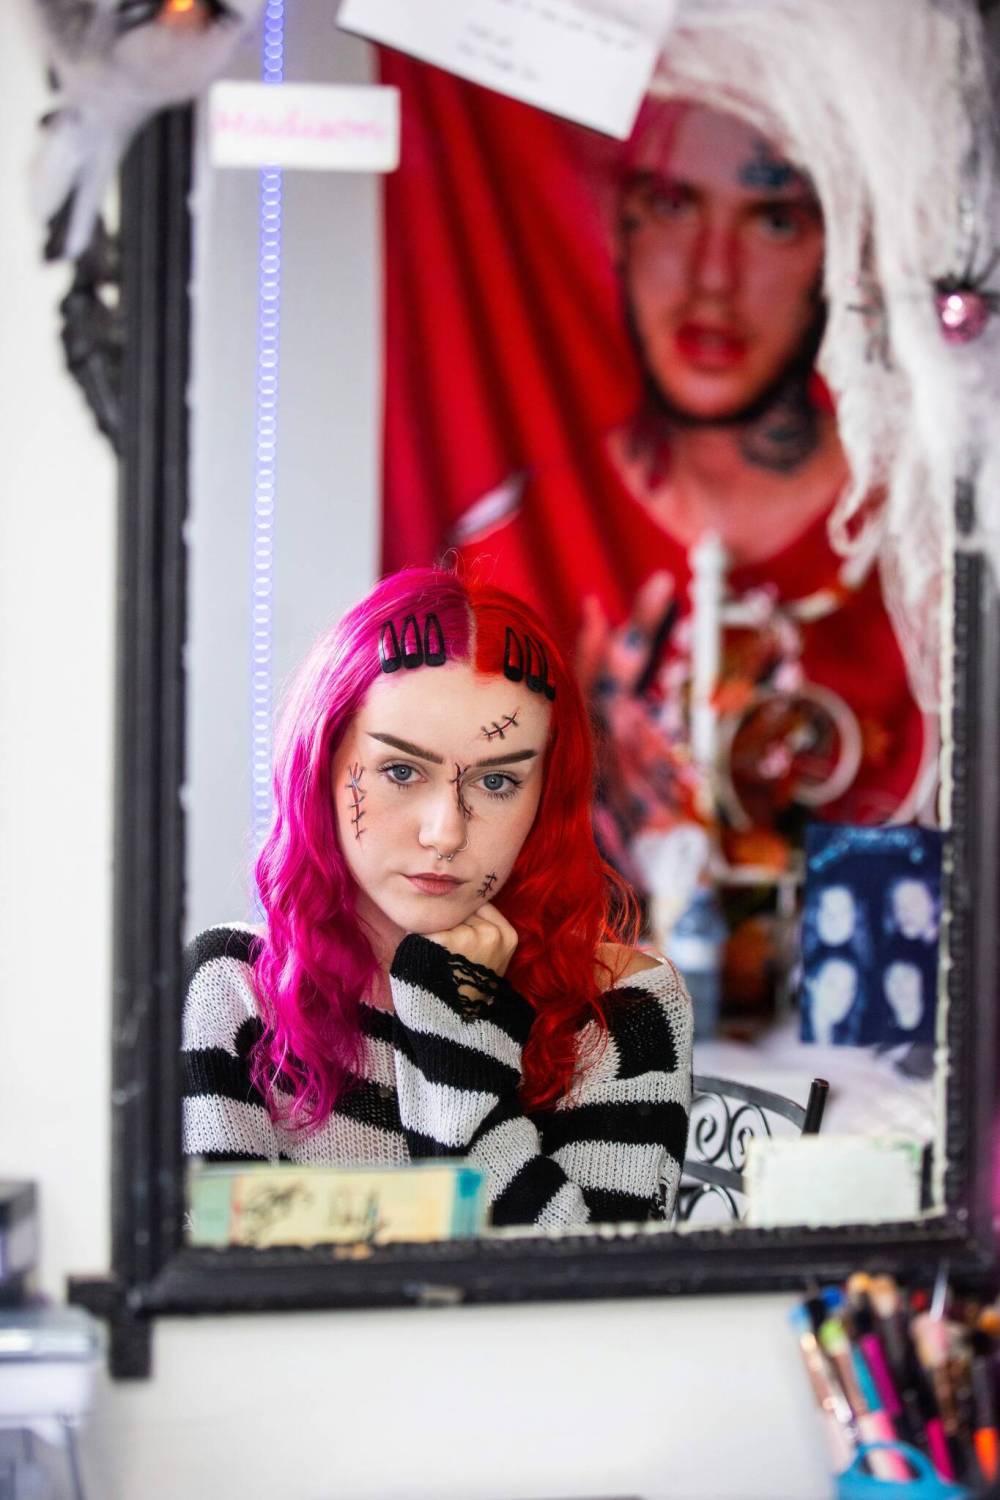
Maddy says: This is the hardest look out of the three. The stitches can be very intimidating and difficult to make look realistic, but practice makes perfect!
You will need:
Fine-bristled brushes (craft or paintbrushes from Michaels)
Slightly thicker brush
Maroon, red, black and white face paints OR maroon and red liquid lipstick, and black and white liquid eyeliner
Brown eyeshadow (light and dark brown)
Bowl or glass of water to clean your brush (if using a brush)
Paper towel to dab off excess water
1. First draw the wound. Using the fine-bristled brush dipped in maroon face paint, or the maroon liquid lipstick, draw fine lines where you want your stitches to be. The lines don’t have to be very straight. Wavy lines sometimes look more authentic.
2. Using a thicker brush and brown eyeshadow, draw an outer line around the maroon lines, leaving a slight gap between the maroon and brown line. Make sure the brown lines on both sides of the maroon “wound” are joined up. The “wound” should now be in the middle of the brown lines.
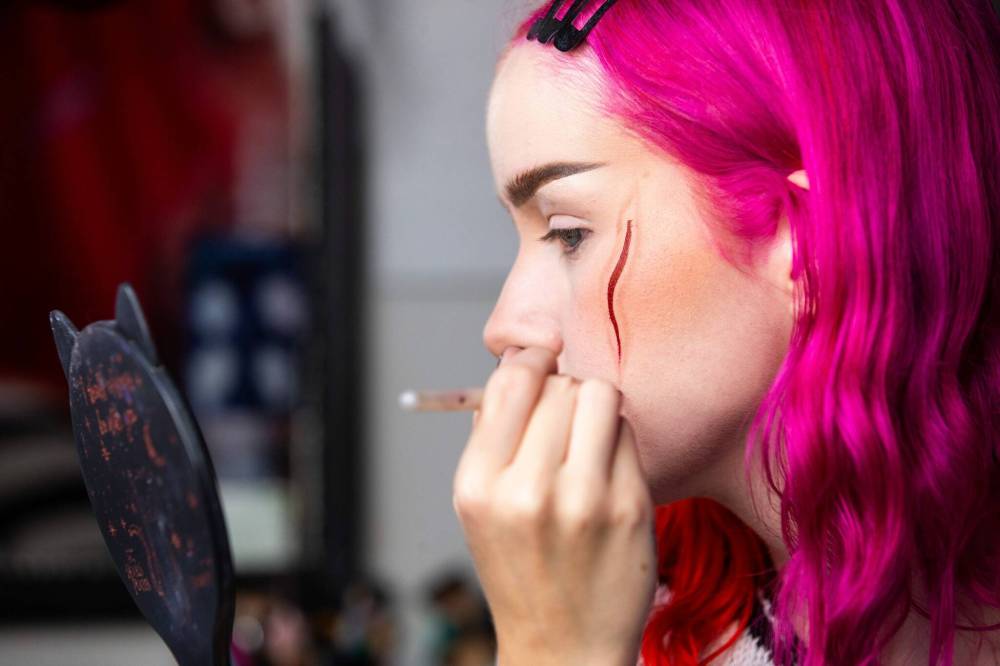
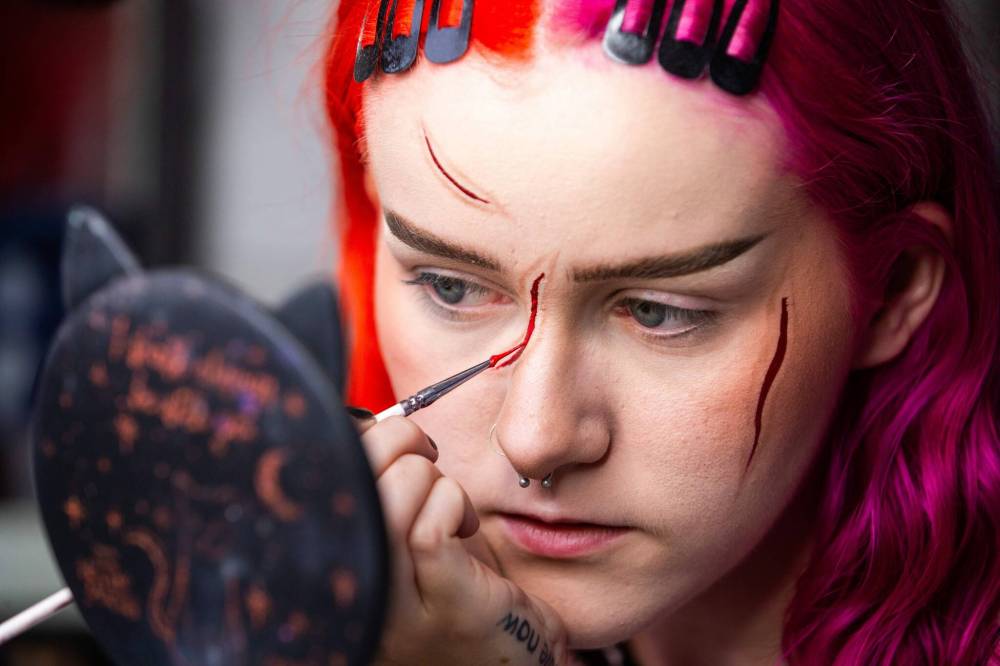
3. Using a fine brush dipped in light-red face paint (or light-red liquid lipstick), go over the middle of the maroon line, stopping halfway through. Do not go all the way down the line.
4. For the stitches: Paint black stitches on the brown shadow outline. You can use black face paint or black eyeliner. Draw small wavy lines across the wound. You can also draw a larger, wavy X across.
5. Add white paint or eyeliner to the centre of the black stitch (not the wound). This will add depth to your stitch.
6. Using the thicker brush and a darker brown eyeshadow, dot around the ends of the stitch to make it look like it’s on your skin. Use a gentle “tap-tap-tap” motion so the brown shadow is diffused, rather than being a hard dot. Pat gently with your fingers to blend the brown even more.
7. Apply mascara to your lashes.
MIKAELA MACKENZIE / WINNIPEG FREE PRESS Maddy Harms blends finishing touches on a faux stitches Halloween make-up look.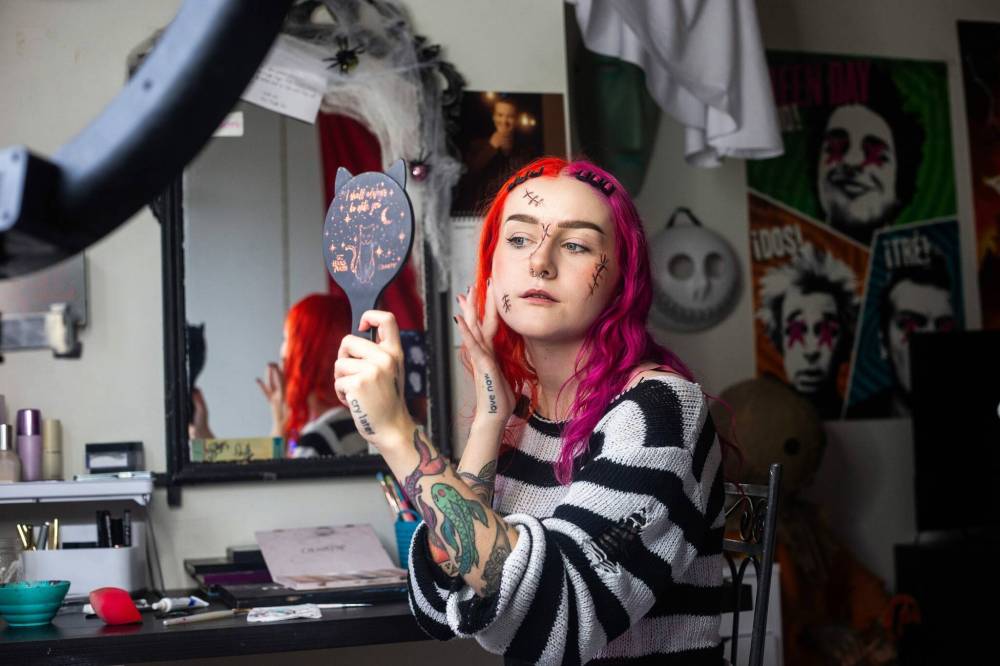
Start with the base-ics
Consider your face a canvas which needs to be primed in order for the looks to sit comfortably. So before you start, first work on your base look.
1. Moisturize using a super-hydrating moisturizer.
2. Apply primer. Harms uses Milk Hydrogrip Primer.
3. Apply concealer.
4. Apply powder. Harms uses Huda Beauty Powder under the eyes and MAC Mineralize Skin Finish to set her face.
5. Waft a couple of pumps of setting spray to finish your base. Harms uses Urban Decay Setting Spray.

AV Kitching is an arts and life writer at the Free Press. She has been a journalist for more than two decades and has worked across three continents writing about people, travel, food, and fashion. Read more about AV.
Every piece of reporting AV produces is reviewed by an editing team before it is posted online or published in print — part of the Free Press‘s tradition, since 1872, of producing reliable independent journalism. Read more about Free Press’s history and mandate, and learn how our newsroom operates.
Our newsroom depends on a growing audience of readers to power our journalism. If you are not a paid reader, please consider becoming a subscriber.
Our newsroom depends on its audience of readers to power our journalism. Thank you for your support.