

Hearth-warming refurb
Like a puzzle, fireplace surround comes together piece by piece
Advertisement
Read this article for free:
or
Already have an account? Log in here »
To continue reading, please subscribe:
Monthly Digital Subscription
$1 per week for 24 weeks*
- Enjoy unlimited reading on winnipegfreepress.com
- Read the E-Edition, our digital replica newspaper
- Access News Break, our award-winning app
- Play interactive puzzles
*Billed as $4.00 plus GST every four weeks. After 24 weeks, price increases to the regular rate of $19.95 plus GST every four weeks. Offer available to new and qualified returning subscribers only. Cancel any time.
Monthly Digital Subscription
$4.99/week*
- Enjoy unlimited reading on winnipegfreepress.com
- Read the E-Edition, our digital replica newspaper
- Access News Break, our award-winning app
- Play interactive puzzles
*Billed as $19.95 plus GST every four weeks. Cancel any time.
To continue reading, please subscribe:
Add Free Press access to your Brandon Sun subscription for only an additional
$1 for the first 4 weeks*
*Your next subscription payment will increase by $1.00 and you will be charged $16.99 plus GST for four weeks. After four weeks, your payment will increase to $23.99 plus GST every four weeks.
Read unlimited articles for free today:
or
Already have an account? Log in here »
Amidst a very hectic end-of-year work schedule, I was able to eke out a few hours over a couple of days to address a lingering upgrade in my very own step-down dining room, the main level of the addition to the house completed in 2018.
From the outset, the gap between the windows on the far wall had been fitted with an early-generation, wall-mount electric fireplace. Unfortunately, the brand did not offer many features, and always seemed bulky. So the space was about to change, for the better.
In recent years, electric wall-mount fireplaces have come a long way. Not only has pricing come way down and the range of sizes expanded, but the plethora of options on newer brands and models put my old bulky beast to shame. Moreover, the old fireplace had been mounted directly to the wall, without being encased (the vent for the heating on this particular unit pointed upward, ruling out an inset application). As such, we lived with it simply mounted to the wall as a stand-alone for the years that ensued after completion of the addition.

Photos by Marc LaBossiere / Free Press
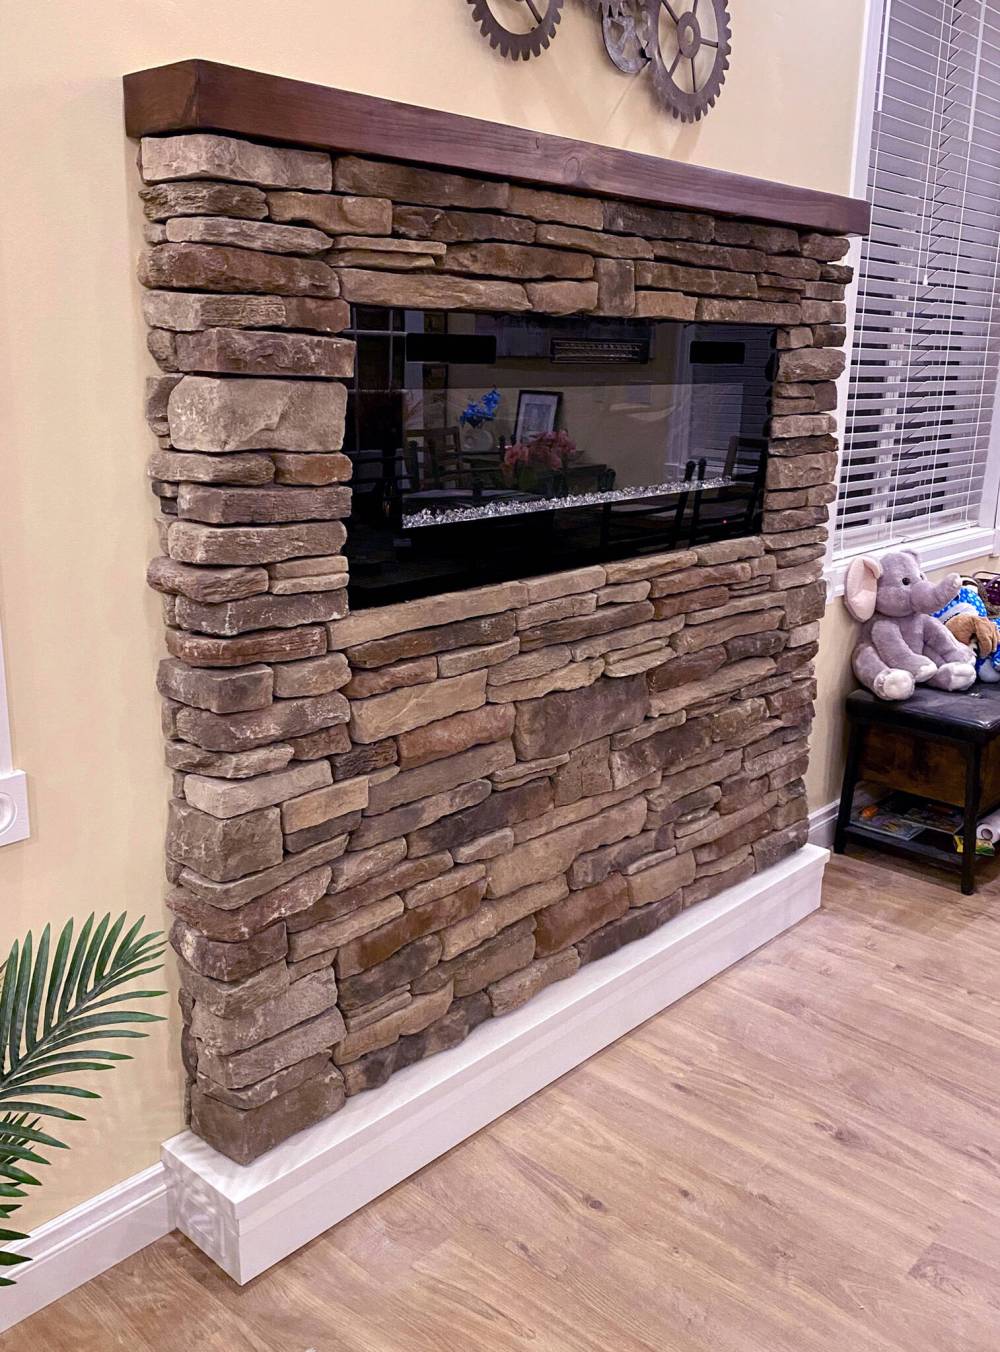
The cultured stone encapsulates the new wall-mount fireplace, creating a prominent eye-catcher in the dining room.
The upgrade design would feature a 66-inch-high build-out structure decorated in cultured stone, capped with a stained wooden mantle and a slightly bigger hearth below. After careful measurements, I decided to frame the main structure to a finished width (including drywall) of 66 inches, at a four-inch depth. The height of the hearth would match the five-inch height of the existing baseboards throughout, with a one-and-a-quarter-inch-high quartz slab at 74-inches wide and eight-inches deep, to serve as the hearth’s top.
The mantle was a pre-fab purchase through Amazon.ca, and measures 72-inches wide, by seven-inches deep at a three-inch girth. Because the cultured stone thickness ranges from one to one-and-three-quarter inches, the 66-inch-wide finished frame would ensure the mantle would overlap the stone in all areas.
Once the main framing was achieved, including the necessary void to accept the new wall-mount fireplace, the existing 20-amp dedicated outlet was repositioned slightly to avoid any conflicts while mounting the fireplace. Two other outlets were also repositioned along the sides of the hearth, to allow continued access.
The hearth itself, framed to a five-inch height, was immediately adorned with flat baseboards that recede back into the existing baseboards along the wall, that had been cut away using an oscillating tool. A one-and-a-half-inch gap was created above the hearth framing to allow for the quartz slab to simply slide into place, atop the hearth framing. The pre-fab mantle was also installed prior to the cultured stone, using the included wall bracket which allows the mantle to slide on and into place against the wall.
Once the drywall was mounted along the front face of the main structure, the fireplace was also installed and tested. With the main features of the structure now in place, the installation of cultured stone could begin.
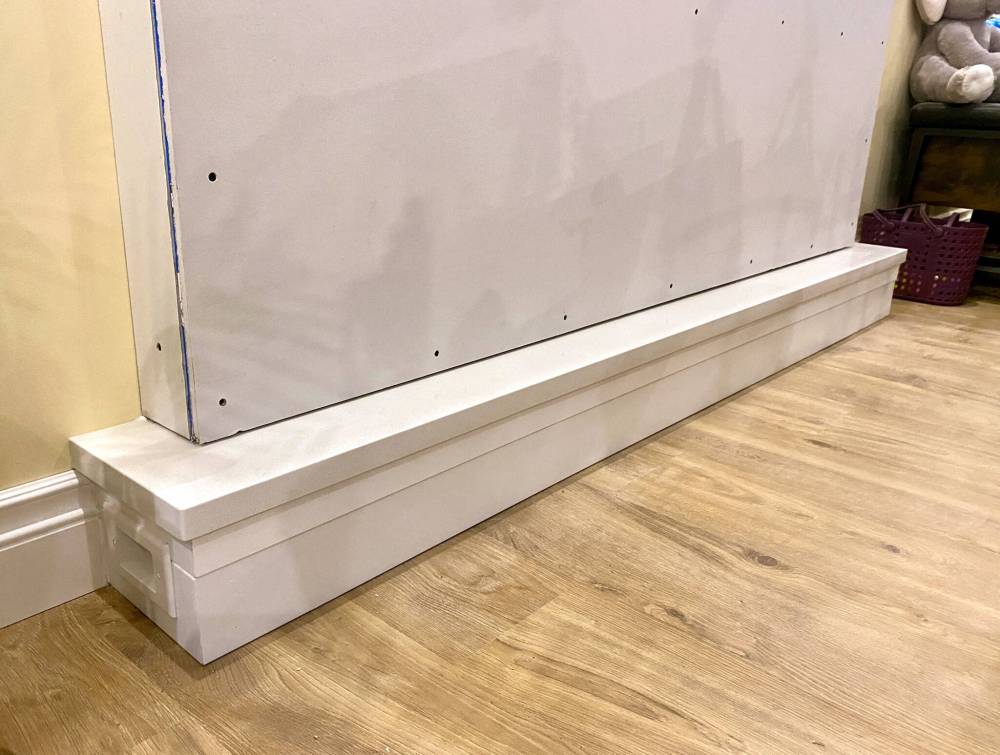
The hearth is framed and decorated with baseboards, with a slab of quartz set atop.
Using cardboard as a spacer above the quartz at the hearth, the first row of stone was mounted using a grey thin-set adhesive polymer, with excellent bond capabilities. Unlike tiling and other stone, the cultured stone chosen for this project are all randomly sized — essentially making it much like putting together a jigsaw puzzle on the fly.
The cultured stone also came in corner pieces, each with varying lengths and depths. The key to a successful installation is first laying out all available stone, so workable choices are visibly available in real time. And even though many of the stone pieces fall out of square, it is important to find another piece that, when placed adjacent or atop, brings the overall lineal view back to level. This is especially important along the top of the hearth, at the bottom and top edges of the fireplace, and directly underneath the mantle overlap.
Moreover, an ongoing awareness of the heights of stone is crucial to ensure actual non-cut stone pieces can be used in the aforementioned locations.
During this project, another challenge presented itself along the corners at each side edge of the fireplace. It was nearly impossible to find enough corners that accurately met the width requirement, without cutting an end that would have stuck out like a sore thumb.
Although it took a while to sort out, I did eventually figure out the best approach, alternating full-length corners and short corners with small stones that closely met the width requirement along both sides of the fireplace face. Once the upper rows above the fireplace face were completed, the final row below the mantle did include a few stones that were indeed cut along the top edge, luckily concealed by the mantle’s overhang.

It’s crucial to display all possible stone choices before beginning the jigsaw puzzle-like process of stone installation.
It was slimmer pickings by that point in the stone installation process. Fortunately, I had purchased an extra 50 per cent of stone square footage, to guarantee adequate stone choice for both main stones and corners.
Once the stone’s thin-set was allowed to dry and cure overnight, the cardboard spacer was removed along the hearth top, as well as a few screws that had been used temporarily to keep the row of stones above the fireplace face in place as the adhesive dried. The remaining stone was removed from the floor within the space, and the room was put back together in much the same way as it had been before the feature fireplace wall was introduced.
As the fireplace was engaged for the first time after completion, I couldn’t help but ask myself why I hadn’t tackled this sooner. No matter — it’s done now, and it truly belongs. It actually looks as though it’s always been there, and that old bulky unit is truly a thing of the past.
RenoBoss.Inc@outlook.com

The stone-installation process gets underway from low to high, making sure to maintain (or return to) level at all times.
Marc LaBossiere / Free Press
Cultured stone is available in straight pieces for main areas, and corners of varying lengths and depths.