

Recording booth gets personal touch
Creativity cranked up for custom music space
Advertisement
Read this article for free:
or
Already have an account? Log in here »
To continue reading, please subscribe:
Monthly Digital Subscription
$0 for the first 4 weeks*
- Enjoy unlimited reading on winnipegfreepress.com
- Read the E-Edition, our digital replica newspaper
- Access News Break, our award-winning app
- Play interactive puzzles
*No charge for 4 weeks then price increases to the regular rate of $19.00 plus GST every four weeks. Offer available to new and qualified returning subscribers only. Cancel any time.
Monthly Digital Subscription
$4.75/week*
- Enjoy unlimited reading on winnipegfreepress.com
- Read the E-Edition, our digital replica newspaper
- Access News Break, our award-winning app
- Play interactive puzzles
*Billed as $19 plus GST every four weeks. Cancel any time.
To continue reading, please subscribe:
Add Free Press access to your Brandon Sun subscription for only an additional
$1 for the first 4 weeks*
*Your next subscription payment will increase by $1.00 and you will be charged $16.99 plus GST for four weeks. After four weeks, your payment will increase to $23.99 plus GST every four weeks.
Read unlimited articles for free today:
or
Already have an account? Log in here »
Hey there, time traveller!
This article was published 30/12/2017 (2877 days ago), so information in it may no longer be current.
Following the completion of the recording studio expansion on the second floor of my home, it was necessary to set up the space — the big question being: where would everything go?
The floor plan was simple — an open concept with no interior walls. When recording instrumentation or vocals, it is sometimes necessary to isolate a certain area within the studio to contain and control the sounds produced by the source. After inquiring on the availability and sizing of simple office dividers (generally used to create individual cubicles), it became clear to me that an alternate option was required — would I need to build an interior wall, after all?
And suddenly, it dawned on me! Rather than search for office dividers that are “close” to the sizing I’d need to quarantine a recording area within the studio space, why not design an adaptable isolation booth, custom built to specification? With pencil in hand, the sketching began. And although the preliminary designs were quite rudimentary, the last sketch, which included design characteristics of the surrounding space, proved to be quite an elegant approach. The evolution of a custom isolation booth had begun.
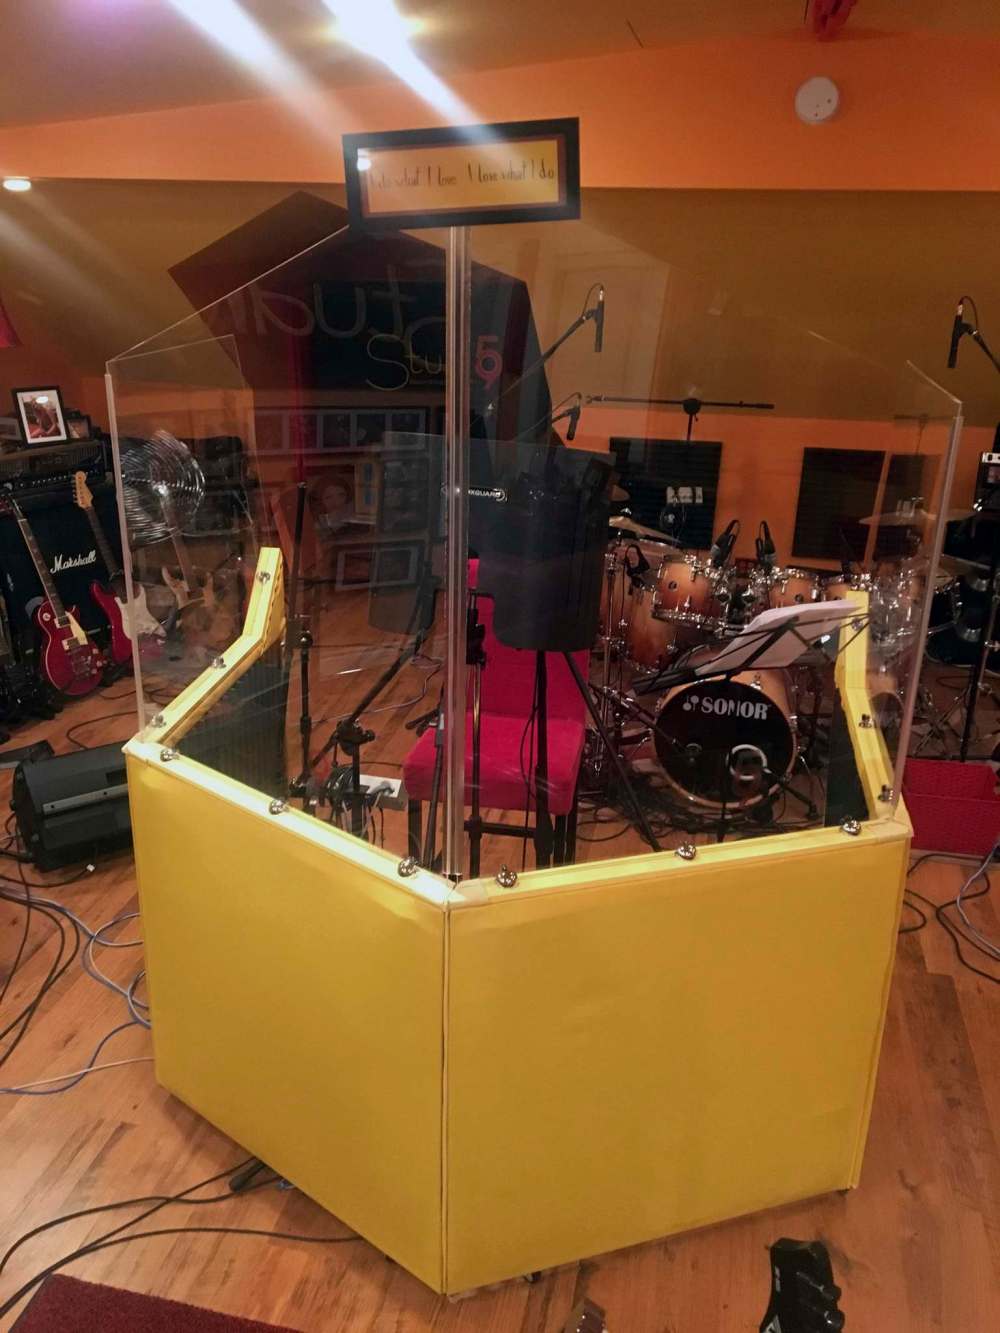
To serve my specific requirements, the isolation booth must possess the following attributes: lightweight folding panels on vertical hinges, clear upper-portions of the panels with vertical hinges in the same locations, and the entire structure must be mobile (on caster wheels). And because there are two symmetrical dormers at the far end of my studio space, the design of the isolation booth incorporates the dormers’ dimensions — with a mobile booth which mimics the inner measurements of either dormer, the booth structure can easily be backed into either dormer for total isolation, should the need arise.
The framework of the four individual solid panels of the booth are built with two-by-three lumber. Each panel consists of an upper and lower cross brace, with vertical studs on each end. To maintain square, 90-degree metal support brackets are secured along the bottom cross brace, and fastened to each vertical stud.
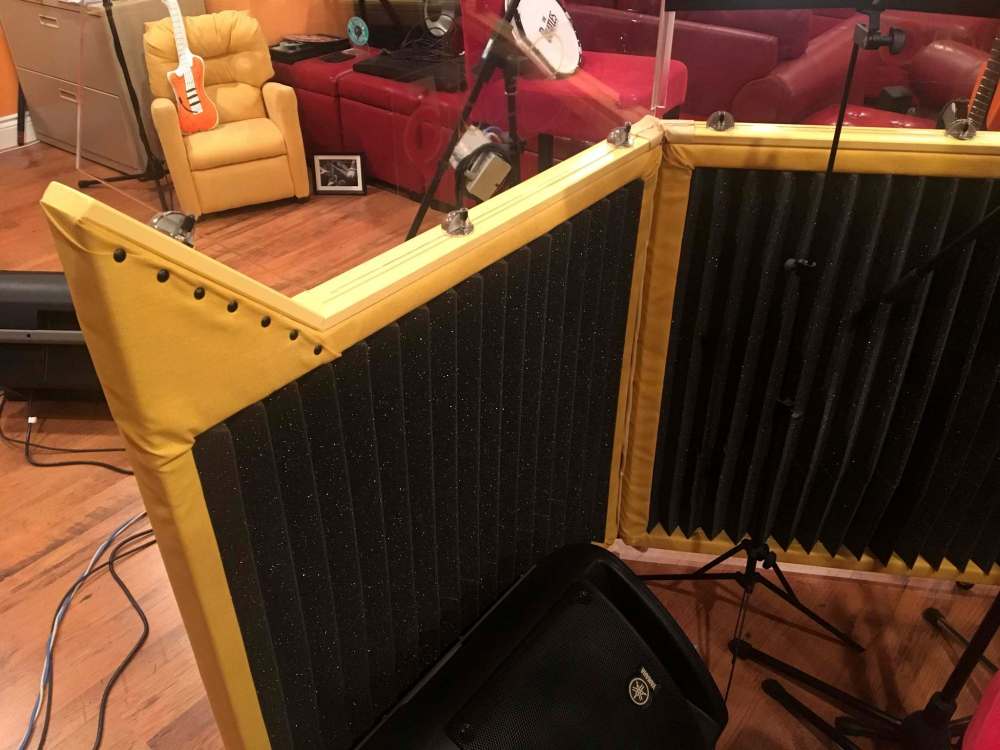
Before the vertical hinges are mounted between each panel (three in total), the exterior framework of each panel is upholstered with a yellow burlap-style material, and stapled along the underside of the top and bottom cross-braces and vertical studs. For decorative purposes, each of the three vertical hinges were wrapped in a yellow pleather, and then all three panels were screwed together.
Two caster wheels were mounted to the bottom of each panel section to allow for easy mobility upon completion.
To finish the tops of the solid panels, pre-painted yellow caps made from one-by-three lumber were fastened to the top brace of each panel, with yellow pleather wrapped at each of the three junction locations (above the wrapped hinges). Black acoustical foam was then secured along the interior cavity of each of the four panels to complete the lower portion of the booth.
The next step was to fabricate the clear upper portion of the panels. To keep things lightweight and shatter-free, the clear panels above the lower framed panels would be made of 0.6-centimetre Plexiglas, with pliable plastic hinges. Of course, this was a step best subbed out to a plastics manufacturer.
Acryl Design of Winnipeg was up to the challenge. To accurately mimic the inner height and slope of the dormer ceilings, I first created a precise cardboard template. The template provided a 1.27-centimetre allowance below the ceiling line, and another 1.27 centimetres between the lower edge of the template and the tops of the solid panel sections, to provide enough clearance for the brackets required to hold the Plexiglas in place. I provided Acryl with my template and a few pictures of the project in progress and awaited the conclusion of the manufacturing process.
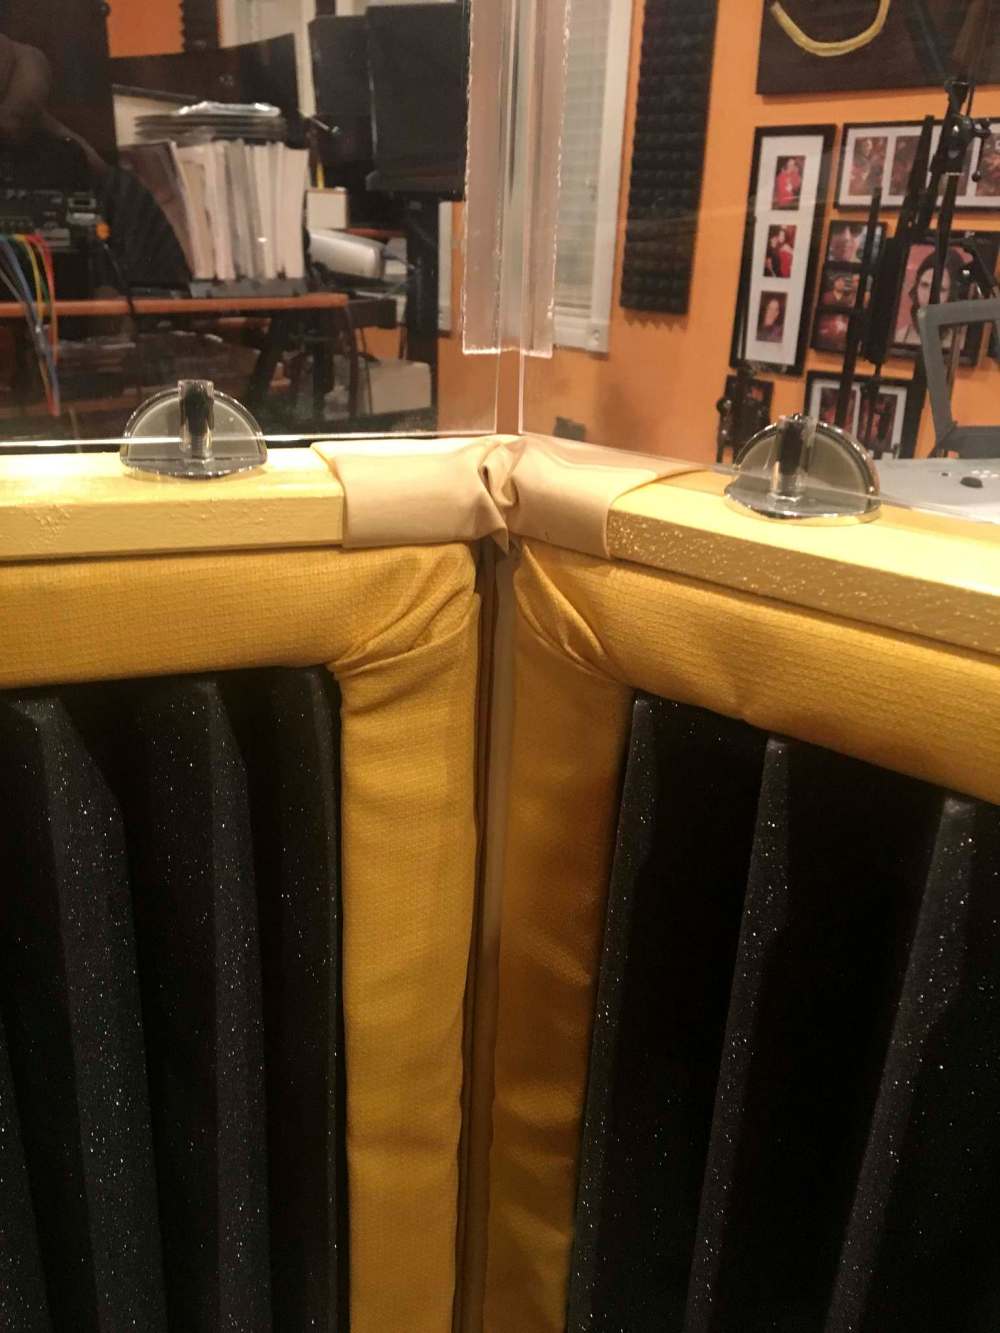
In the meantime, a frivolous attempt at sourcing affordable brackets persuaded me into making my own custom brackets. As such, I elected to modify chrome dome doorstops. By fastening three doorstops to the top of each lower panel cap with a shaft-head screw, and once the custom bracket was secured in place, the shaft portion of the screw was fashioned with a short rubber tube. Once the Plexiglas was set into place, the rubber along the exposed shaft would create enough friction to hold the Plexiglas securely in position.
A few weeks after dropping off the template at Acryl, the clear four-panel upper portion of my booth was ready for pick up… and the moment of truth was at hand. With a deep breath, the clear folding four-panel design was set atop the lower framework of the booth. After a couple of slight adjustments, every single hinge lined-up perfectly.
A custom Studio 59 isolation booth was born. Throughout the years, this booth has proven invaluable. Not only does it quarantine sound directionality while recording, it also allows direct visual contact from behind the isolation booth.
And, this lightweight structure is mobile! I truly cannot wait to once again, spend those countless hours in studio, standing within the booth behind the mic doing what it is I love best. If I had a new year’s resolution, that would have to be it — more time in the booth. ’Cuz nothing hones a meticulous nature better than making music, in a custom-built, zen-like space conducive to creativity where joy comes full circle!
All the best in the new year!
BossEnterprise@outlook.com
