

Column-style shower head worth the effort
Different installation required for cool fixture
Advertisement
Read this article for free:
or
Already have an account? Log in here »
To continue reading, please subscribe:
Monthly Digital Subscription
$0 for the first 4 weeks*
- Enjoy unlimited reading on winnipegfreepress.com
- Read the E-Edition, our digital replica newspaper
- Access News Break, our award-winning app
- Play interactive puzzles
*No charge for 4 weeks then price increases to the regular rate of $19.00 plus GST every four weeks. Offer available to new and qualified returning subscribers only. Cancel any time.
Monthly Digital Subscription
$4.75/week*
- Enjoy unlimited reading on winnipegfreepress.com
- Read the E-Edition, our digital replica newspaper
- Access News Break, our award-winning app
- Play interactive puzzles
*Billed as $19 plus GST every four weeks. Cancel any time.
To continue reading, please subscribe:
Add Free Press access to your Brandon Sun subscription for only an additional
$1 for the first 4 weeks*
*Your next subscription payment will increase by $1.00 and you will be charged $16.99 plus GST for four weeks. After four weeks, your payment will increase to $23.99 plus GST every four weeks.
Read unlimited articles for free today:
or
Already have an account? Log in here »
Hey there, time traveller!
This article was published 14/09/2019 (2270 days ago), so information in it may no longer be current.
In recent years, the shower column has become one of my favourite talking points when planning a shower-stall upgrade with clients. Although the installation process differs slightly from that of the traditional shower-faucet assembly, the result is undeniably pleasing to the senses.
If you’ve ever undergone the process of tearing apart an old shower stall down to the studs, you would have undoubtedly come across some recognizable plumbing — hot and cold copper water feeds soldered to a brass faucet assembly, with a vertical copper feed that supplies water to the shower head.
When replacing an old faucet with a newer model or updated version, this would be the time to install it, along with the shower-head feed, BEFORE the new aqua-board and tiling are completed. The shower column, on the other hand, requires a staggered installation — only the water feeds are prepped prior to the drywall stage.

The wall-mount shower column is a self-contained unit that (depending on the model) provides several water-flow features without the need for complex plumbing within the walls. Unlike a standard shower faucet, the column is a surface-mount unit, that only requires access to the hot and cold water feeds, fitted with the appropriate manner of tie-in.
It is best to carefully read the installation instructions of the shower column you’ve selected before you begin the shower-stall upgrade, to determine the manner of tie-in required, as well as the mounting instructions.
Once the old brass faucet has been removed, both the hot and cold feeds must be adapted to accommodate the impending column install. If the existing plumbing is half-inch copper, I prefer to solder sweat-to-PEX adapters and run flexible PEX lines with in-line shut-off valves. That way, when it’s time to tie in the column, the in-line valves can be opened one at a time to test for leaks. I’ll, of course, get to that a bit later.
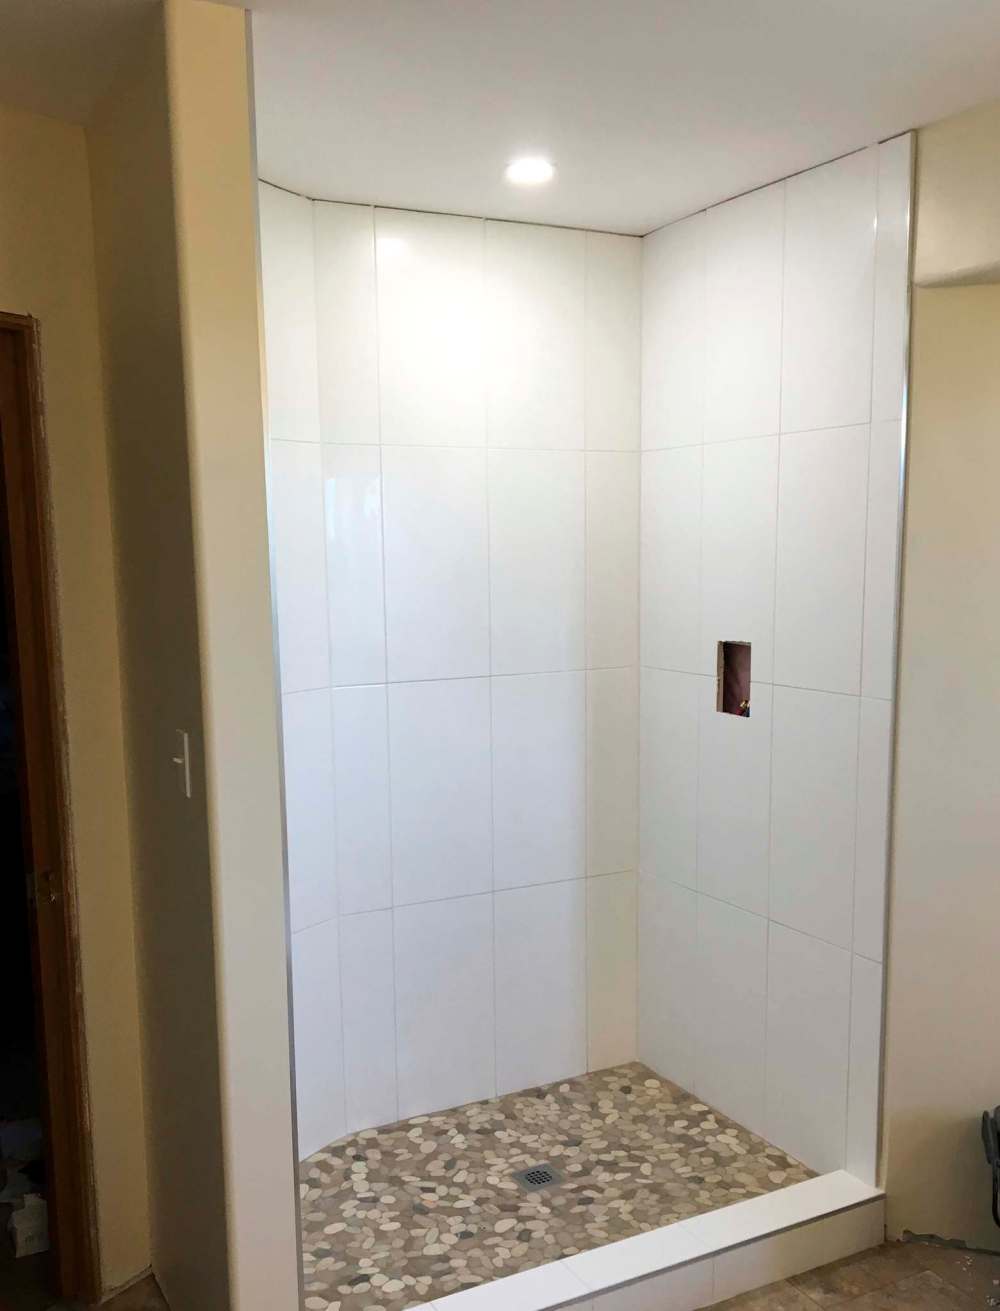
With the feeds prepped and the in-line valves closed, the new mould-resistant drywall is installed, with the feeds left hidden behind the wall. Based on the column-mounting specs, the drywall is breached to create a small access hole to reveal the feeds. In this instance, the tie-in requires3/4-inch threaded PEX adapters on which the column hot and cold mesh hoses can be affixed, respectively. The access hole is preserved during the tiling stage, ensuring adequate access to the PEX lines.
Once the tile has been grouted, the shower column mounting process can begin.
Two brackets are affixed along the vertical tile (above and below the access hole), by carefully drilling holes into the tile and fastening the brackets using wall anchors and stainless-steel screws.
With the (fully assembled) shower column in hand, both the hot and cold mesh hose lines are attached to the 3/4-inch threaded PEX couplings. Both in-line shut-off valves are then fully opened, one at a time — it is imperative to immediately check for leaks at this stage.
To facilitate the process, a stepladder can be used to prop the shower column on the stairs in close proximity to the access hole, allowing proper tightening of the mesh hoses and careful inspection of all connectors within the column’s internal workings.
With confirmation that no leaks exist, the mesh hoses are tucked into the access hole and the column can then be set into position by slowly sliding the column along the tiled wall until the brackets draw the column in tightly, fully hiding the access hole once in place.
As a finishing step, a thin bead of clear silicone on either side of the column keeps it from being accidentally displaced.
For the past five bathroom renos, whereby a shower column would be installed in lieu of a standard shower faucet, it is this particular stainless-steel model by UBERHAUS (#S9204) that has been chosen. I suspect it is so popular because it is very reasonably priced and features four water options: rainfall, waterfall, body jets, and a hand-held spray nozzle. Although my clients are likely swayed by the features and the price, it’s the ease of installation that I love best.

And, hey, no denying it sure looks cool, too.
bossenterprise@outlook.com