

Tray ceiling becomes new focal point
Living room upgrade both practical and eye-catching
Advertisement
Read this article for free:
or
Already have an account? Log in here »
To continue reading, please subscribe:
Monthly Digital Subscription
$0 for the first 4 weeks*
- Enjoy unlimited reading on winnipegfreepress.com
- Read the E-Edition, our digital replica newspaper
- Access News Break, our award-winning app
- Play interactive puzzles
*No charge for 4 weeks then price increases to the regular rate of $19.95 plus GST every four weeks. Offer available to new and qualified returning subscribers only. Cancel any time.
Monthly Digital Subscription
$4.99/week*
- Enjoy unlimited reading on winnipegfreepress.com
- Read the E-Edition, our digital replica newspaper
- Access News Break, our award-winning app
- Play interactive puzzles
*Billed as $19.95 plus GST every four weeks. Cancel any time.
To continue reading, please subscribe:
Add Free Press access to your Brandon Sun subscription for only an additional
$1 for the first 4 weeks*
*Your next subscription payment will increase by $1.00 and you will be charged $16.99 plus GST for four weeks. After four weeks, your payment will increase to $23.99 plus GST every four weeks.
Read unlimited articles for free today:
or
Already have an account? Log in here »
Hey there, time traveller!
This article was published 14/12/2019 (2218 days ago), so information in it may no longer be current.
Four years ago, clients of mine wanted a new ceiling in their kitchen, both to rid the room of unwanted stipple and to allow for new lighting. Recently, I was back, and while the latest ceiling upgrade had those goals in mind as well, the latest project created a decorative feature that became the highlight of the living room.
While calculating the materials needed to strap the ceiling along the nook next to the kitchen, the living room and hallway leading to the garage door, my clients said they wanted to create an artistic feature in the living room — a tray ceiling.
We worked out the design shape, which (in my opinion) must mimic the perimeter of the living room including the corner fireplace.
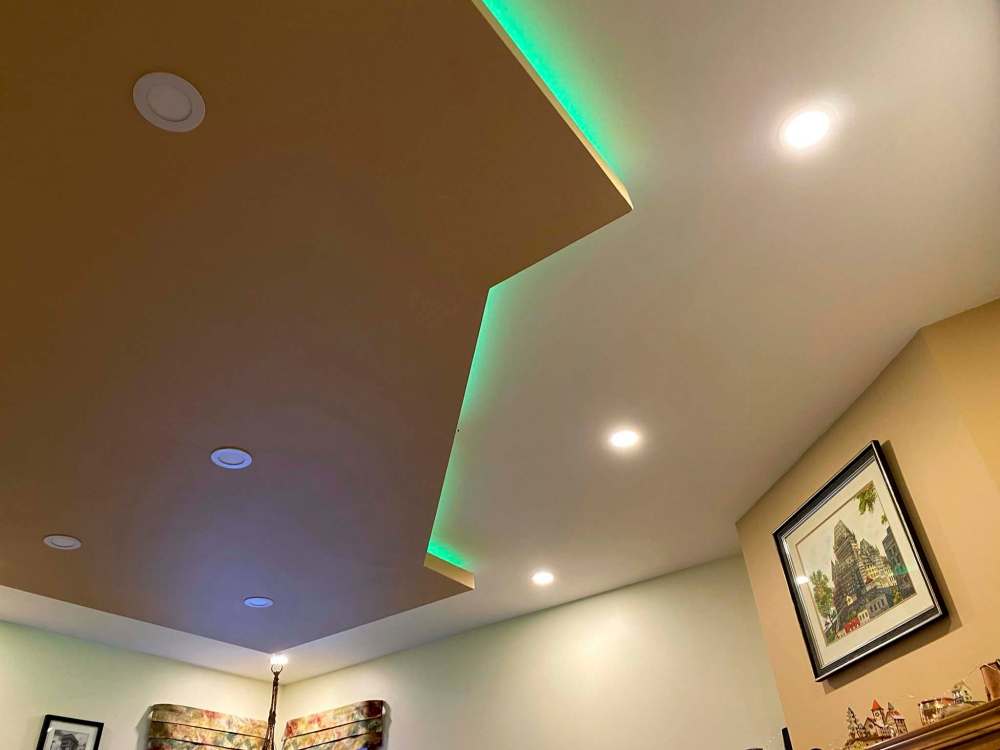
The project would add nearly two dozen slim, four-inch LED pot lights on four existing circuits, while a fifth circuit would be added to control coloured strip-lighting inset within the lip of the tray ceiling’s edge. The materials were delivered to the job site, and the work promptly began.
The shape of the tray structure was initially marked along the ceiling using thin coloured string. This allows the clients to visually confirm the size and shape of the impending build. Two-by-fours set on end were secured to the existing ceiling using five-inch lag screws, in the shape of the tray design. Inner boards were set at 16-inch centres to complete the tray formation. The remaining ceiling surfaces were then strapped with one-by-fours, perpendicular to the joists behind the existing stippled drywall, using 3½-inch screws at every joist. The one-by-fours, on which new drywall could be fastened, were also set on 16-inch centres.
After the wiring was installed for the new LED pot lights and the new strip-lighting circuit was fed into the tray structure, drywall was then installed. The height of the tray structure was adjusted to ensure enough room for the installation of the coloured strip-lighting while minimizing downward protrusion. Careful measurements revealed that the already-built two-by-four tray structure required another two-by-four on the flat. It was then lowered another three-quarter inches with the one-by-eight that creates the ledge upon which the strip-lighting will be set. With these additional steps in place, drywall was affixed to the tray ceiling.
Throughout the process, the slim LED pot lights were systematically installed by drilling out four-inch holes at every pre-ordained location, and subsequent tie-in to the wiring achieved prior to the drywall stage. A final one-by-three wooden edge was mounted along the outer perimeter of the tray ceiling, to create a trough within which the strip lighting could be concealed. The strip-lighting was then inserted and connected to the dedicated circuit for tray perimeter lighting. Although the on-off of the strip-lighting can be controlled by the new wall switch, it is the remote control (and mobile app) that provides the ultimate experience via a multitude of colour options, dimming, strobe, and fade-in/fade-out features.
The drywall taping and mudding stages were completed a few days later, and all ceiling surfaces were sanded to ‘paint-ready’ stage. My client had voiced his inclination to do the painting himself, with the assurance that he’d advise once the tasks had been completed so I could “come have a look”. Within a couple weeks, I was indeed invited back for the big unveiling. Not only had all renovated areas been beautifully repainted, they had also been repopulated. Every aspect of each renewed space simply looks spectacular. My client did an amazing job completing the project’s painting tasks — he should be proud.
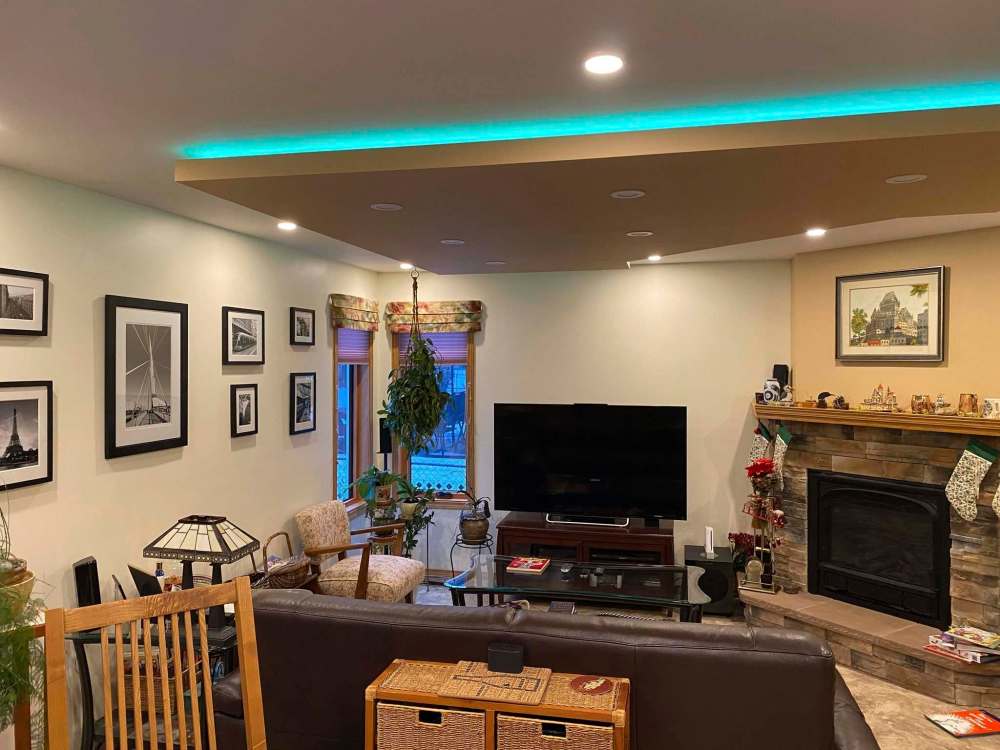
While taking photos of the finished product, I revealed to the clients how rare it is that I’m afforded the opportunity to see the fully populated space. Generally, my photos only entail the last steps achieved during the construction and renovation process. What a treat it was for me to enjoy my clients’ renewed spaces, in the manner they are used on a daily basis. I just couldn’t stop staring at that tray ceiling — what a great idea that was. Kudos to my clients for their vision — I wish them many years of enjoyment.
bossenterprise@outlook.com
