

What an open concept
New support beam makes wall history
Advertisement
Read this article for free:
or
Already have an account? Log in here »
To continue reading, please subscribe:

Digital Subscription
One year of digital access for only $205*
- Enjoy unlimited reading on winnipegfreepress.com
- Read the E-Edition, our digital replica newspaper
- Access News Break, our award-winning app
- Play interactive puzzles
*First annual payment billed as $205.00 + GST for one year. This annual subscription will automatically renew at $233.00 + GST every 52 weeks (10% off the regular annual price of $259.35). Offer available to new and qualified returning subscribers only. Cancel any time.
To continue reading, please subscribe:
Add Free Press access to your Brandon Sun subscription for only an additional
$1 for the first 4 weeks*
- Enjoy unlimited reading on winnipegfreepress.com
- Read the E-Edition, our digital replica newspaper
- Access News Break, our award-winning app
- Play interactive puzzles
*Your next Brandon Sun subscription payment will increase by $1.00 and you will be charged $17.95 plus GST for four weeks. After four weeks, your payment will increase to $24.95 plus GST every four weeks.
Read unlimited articles for free today:
or
Already have an account? Log in here »
Hey there, time traveller!
This article was published 25/03/2023 (1227 days ago), so information in it may no longer be current.
Replacing a load-bearing wall with a support beam to introduce an open concept floor plan is a multi-faceted exercise. At my current jobsite, the removal of drywall on the existing wall exemplified this fact to the extreme — this load-bearing wall was the conduit for every imaginable service to the second-floor. Replacing this wall with a new beam to create an open concept on the main floor would prove to be a challenging adventure, and the road less taken.
The homeowner sent a text containing only two words, upon heeding my suggestion to reveal the innards of the dividing wall between the existing kitchen and living room: “bad news”. My response was encouraging, and basically emphasized that no matter the situation, there would be a solution. And there eventually was, but it took some doing to sort out.
There were three main ducts that fed the upper floor ventilation, a three-inch ABS plumbing stack from the second floor bathroom, seven or so electrical circuits, a telephone line, central vac PVC, as well as the main support studs that provided support to the second floor joists. Before the new beam could be introduced, it was necessary to re-route every service. As such, a bulkhead was required to “hide” the ceiling aspects of the re-routing, a build-out along the back wall for the ducting and stack, as well as a slight build-up along the main floor to return the ducts and stack back to tie-in to the existing locations.
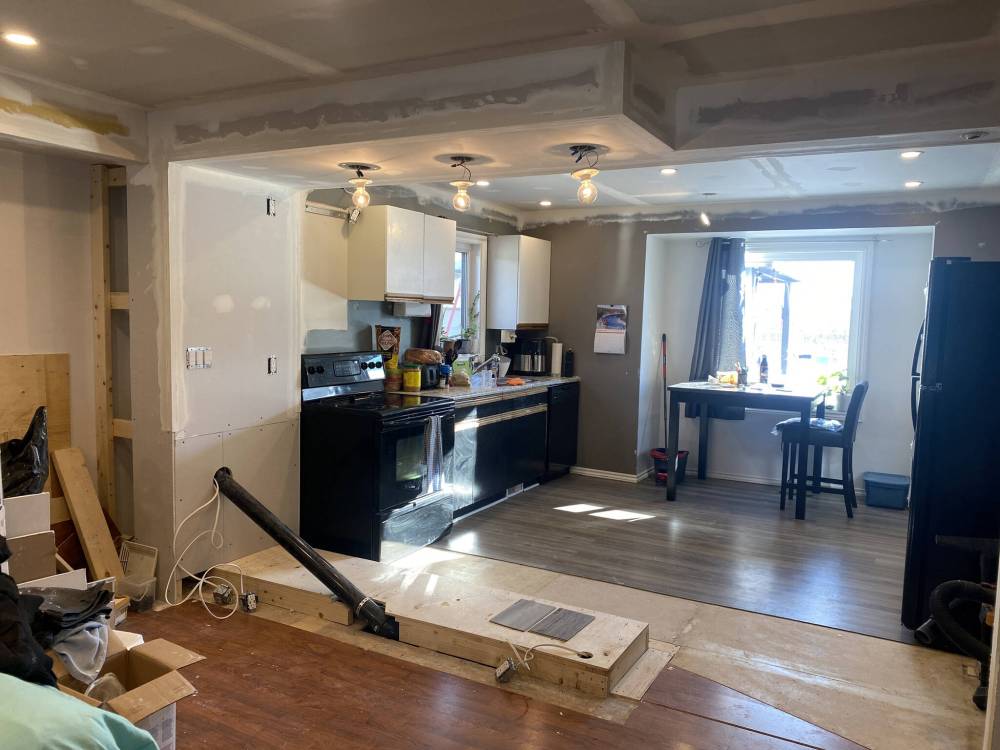
With all services re-routed and functioning, the newly framed bulkhead and wall build-out were sheathed in drywall, while the floor build-up was topped with rigid three-quarter-inch plywood. (Marc LaBossiere / Winnipeg Free Press)
Because the new kitchen layout would extend beyond the existing placement of the load-bearing wall, a peninsula island would conveniently hide the floor build-up below the cupboards of the island, and the bulkhead above (in the same footprint as the countertop and cupboards below) would both hide the services from the ceiling, and serve as and an aesthetic protrusion upon which decorative lighting can be mounted above the island countertop. The cupboards themselves would be designed to accommodate the required anomalies – once everything is installed, it would appear as though the bulkhead above was introduced to mimic the peninsula island even though its true purpose was to create a cavity through which the re-routed services could run undetected.
Before the beam could be introduced, the old studs must be removed. However, temporary support must be provided to the second-floor joists before any of the studs are removed. To achieve this, temporary walls were required on either side of the existing load-bearing wall. And to ensure maneuverability of the beam, each of the three, 11 and seven-eights by one and three-quarter thick LVLs were cut to length, and placed along the base adjacent the existing load-bearing wall to be removed. The temporary walls were erected, and the studs of the existing support wall were displaced and discarded, one by one, carefully negotiating the services still in place. Once all framing elements of the old wall were gone, two-by-six boards in sets of three were positioned at each and of the wall location, affixed to the adjacent and respective walls. Cut shorter than the ceiling height by the height of the LVLs, these two-by-sixes will serve as the support for the new beam.
Once at a time, the LVLs were set atop each end of the two-by-six tripled support stud, until all three were properly in position. Because the measurements were within a thirty-second of an inch, it was necessary to “urge” the LVLs into place using a small sledgehammer. With the new tripled LVL beam in place, the temporary support walls on either side were summarily removed. The open concept had begun to take shape.
Once the electrical circuits were sorted, recycled, and re-routed, the repositioning of the ABS stack was tackled. The maximum grade provided within the bulkhead height would encourage the fastest flowrate until the vertical decent along the wall build-out. A 45-degree angle was then introduced just below countertop height until the ABS reaches the floor build-up, which then hides the path of the ABS back to tie-in at its original location within the main floor joists. The cupboards would be designed at a slightly shallow depth to hide the ABS behind the decorative backing of the peninsula island. The three ventilation ducts were temporarily re-attached using accordion flexible ducts (to allow heating to the second floor during the transition). And once the ducts were formally tackled, each four-inch duct was directed horizontally along the underside of the ceiling joists, vertically down the back wall, and then along the floor below the impending build-up to then be re-attached to its source. The central vac was abandoned (upon the homeowner’s request), as well as the telephone landline.
With the beam in place, and the services completely re-routed to conform with the impending bulkhead, which in turn was designed in conjunction with the cupboards layout throughout, the bulkhead was framed to match the footprint of the peninsula island, and a height of roughly 10 inches (the reveal height of the new beam after the ceiling were strapped and drywalled with new lighting etc). The area was then sheeted with new drywall, awaiting mud coats and subsequent primer and paint, when the rest of the main floor was to be painted. The space would remain in this state awaiting the arrival of the new cupboards and quartz countertops. In the meantime, there was a whole bunch of other tasks to complete, including new flooring, new doors, new casings and baseboards – there was a ton of work to do! However, completing the services re-route and establishing the best approach to incorporate the new cupboard design layout for the peninsula island was a huge load off my mind.
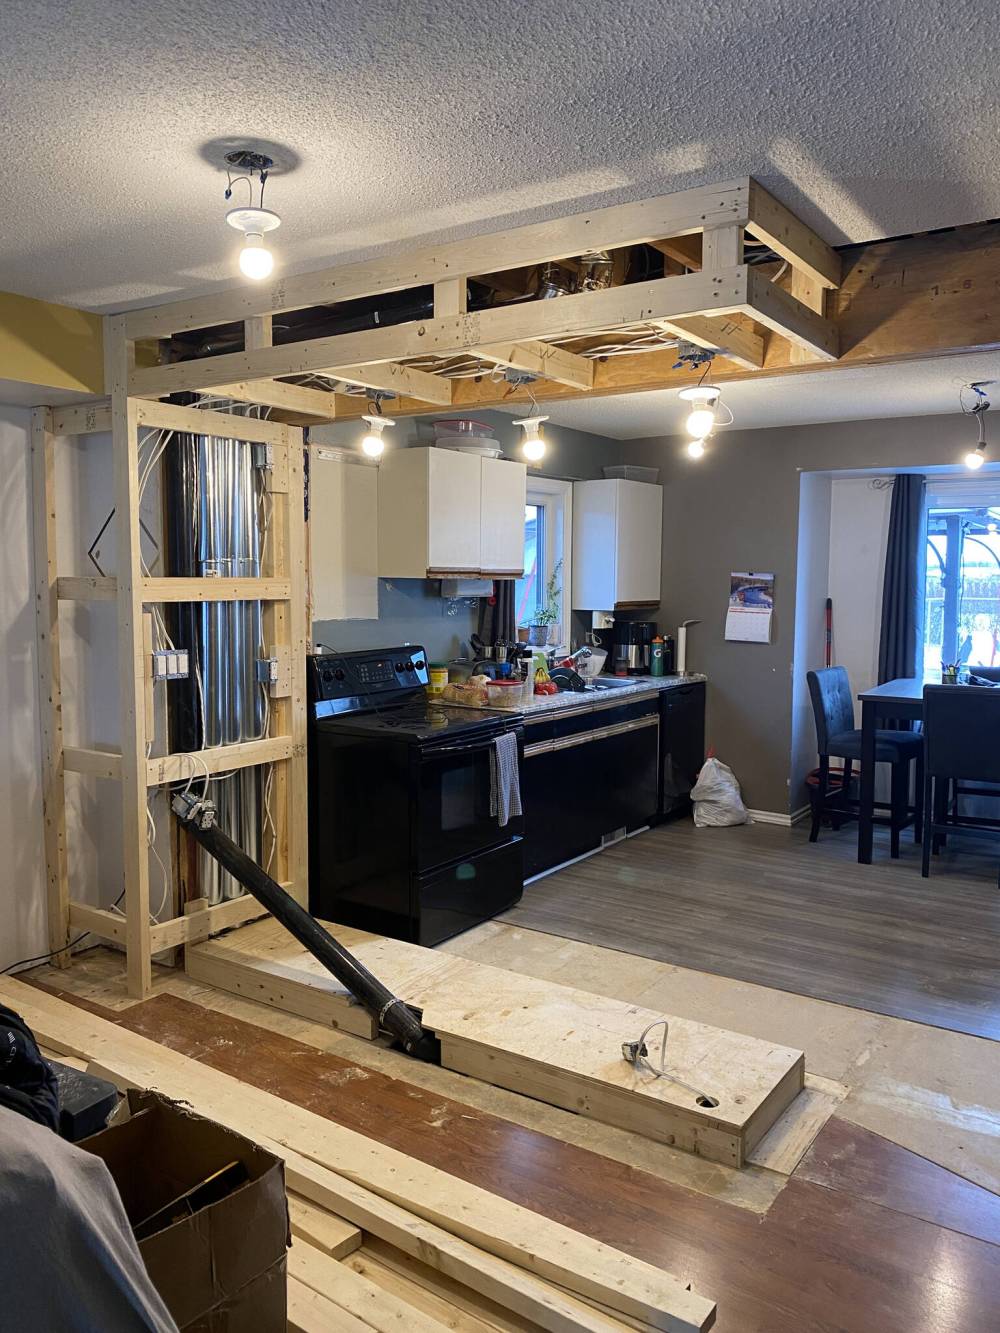
Once all the services were re-routed and functional, the upper bulkhead, wall build-out and floor build-up were framed to hide the redirected services. (Marc LaBossiere / Winnipeg Free Press)
Nothing is ever “bad news”, even when it seems as though there are no immediate options. In my world, there is ALWAYS a way to achieve a goal, even if the path is not yet visible. The first issue is sorted out, and then the next. Before you know it, a solution to the entire matter has been implemented and the project is allowed to continue. That being said, this particular scenario was extremely complicated, one of the more challenging beam implementations in my career. And it sure feels good that it worked out so well. The main floor is truly “open”, now — it’s like a completely different house! And the homeowners admitted they wished they had done this years ago.
RenoBoss.Inc@outlook.com
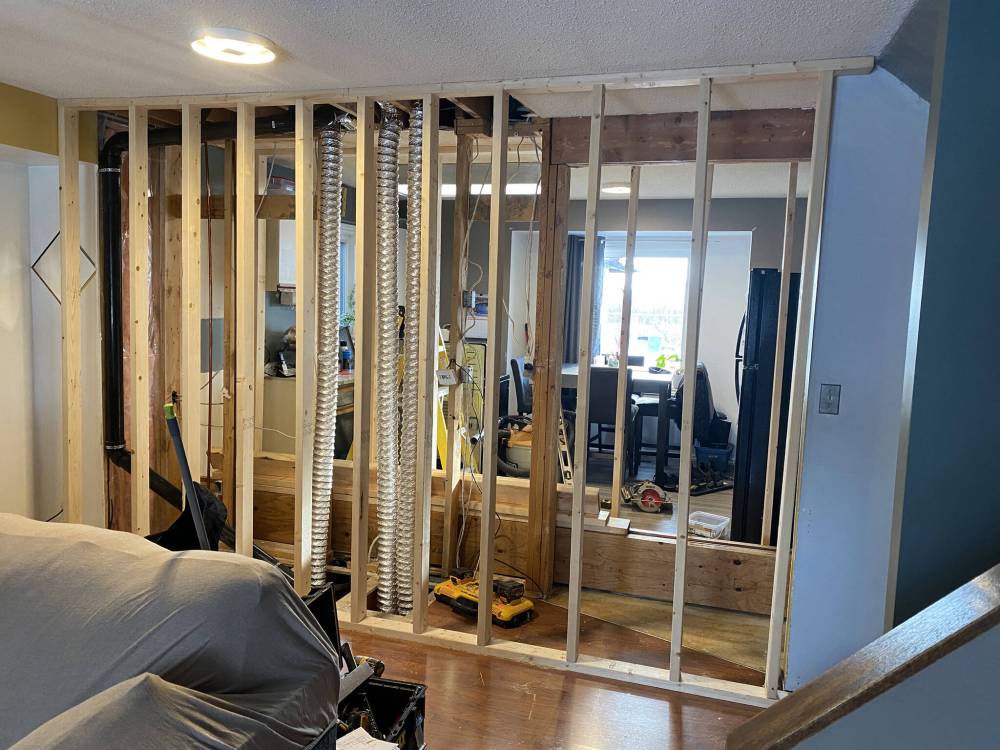
Before the old load-bearing wall was removed, temporary walls on either were build to share the load until the new beam was installed. (Marc LaBossiere / Winnipeg Free Press)