

Tub surround a tricky installation
Pre-planning and exact measurements crucial to success
Advertisement
Read this article for free:
or
Already have an account? Log in here »
To continue reading, please subscribe:
Monthly Digital Subscription
$0 for the first 4 weeks*
- Enjoy unlimited reading on winnipegfreepress.com
- Read the E-Edition, our digital replica newspaper
- Access News Break, our award-winning app
- Play interactive puzzles
*No charge for 4 weeks then price increases to the regular rate of $19.00 plus GST every four weeks. Offer available to new and qualified returning subscribers only. Cancel any time.
Monthly Digital Subscription
$4.75/week*
- Enjoy unlimited reading on winnipegfreepress.com
- Read the E-Edition, our digital replica newspaper
- Access News Break, our award-winning app
- Play interactive puzzles
*Billed as $19 plus GST every four weeks. Cancel any time.
To continue reading, please subscribe:
Add Free Press access to your Brandon Sun subscription for only an additional
$1 for the first 4 weeks*
*Your next subscription payment will increase by $1.00 and you will be charged $16.99 plus GST for four weeks. After four weeks, your payment will increase to $23.99 plus GST every four weeks.
Read unlimited articles for free today:
or
Already have an account? Log in here »
Hey there, time traveller!
This article was published 15/04/2023 (970 days ago), so information in it may no longer be current.
When installing a new 60-inch tub within an existing 60-inch inset, the process is fairly straight-forward. Once the old tub has been removed, the new tub and shower faucet is plumbed with the water feeds, and the new tub drain is mapped and tied-in to the new tub drain and overflow. The tub can be moved into position, and tilted upward slightly to ensure all elements line-up before the final steps are achieved to permanently secure the tub in place. With a tub surround however, the process can be much trickier.
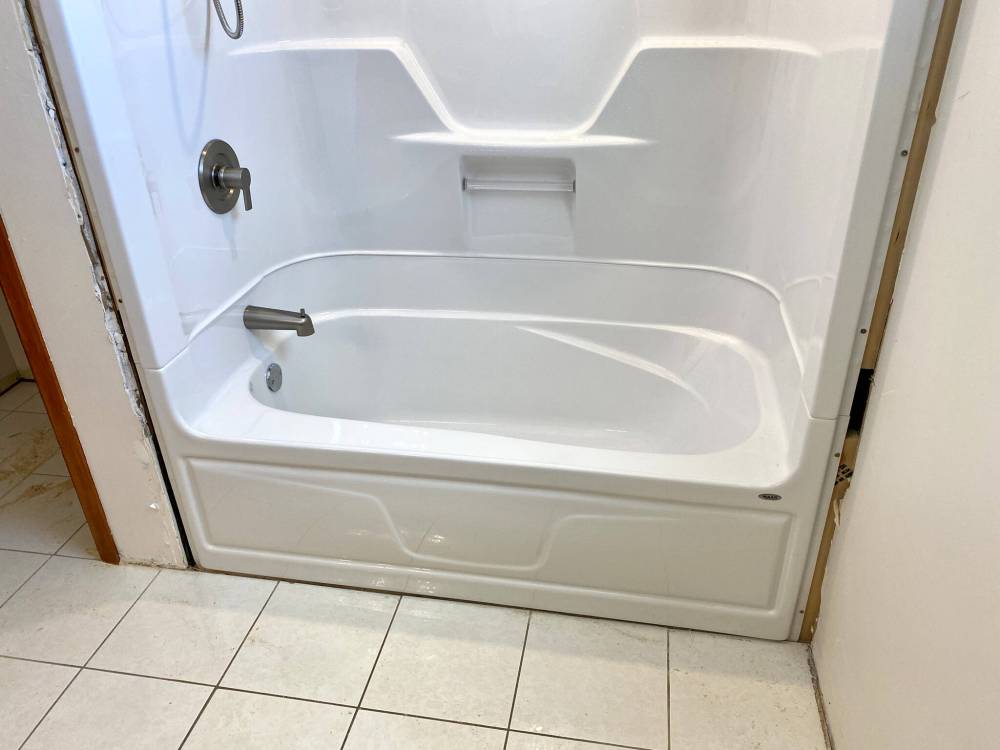
Unlike a simple tub installation, the tub surround (which in this instance includes a one-piece three walled middle section, and a full ceiling cap), tilting the unit to ensure elements of the unit are properly aligned with both the pre-prepped drainage ABS and water feeds is not a viable approach, in that all three section of the unit (tub, middle, ceiling) must be pre-assembled before the unit is set into position. Without access from behind, the sections are first bolted together so it becomes one full unit prior to permanent placement. Before achieving this, the tub section is first set into location to ensure the tub is fully supported and level, shimming where required. Once the sub-floor is prepped, the tub drain and overflow are then mounted onto the tub section before the unit is fully assembled.
The tub spout is set to protrude the unit’s fiberglass wall just above the drain’s overflow, of the tub section. The shower faucet is placed roughly 36 inches from the floor elevation along the middle section, which in this instance is 12 inches from the top of the tub section. And finally, the shower head spout will exit at the 78-inch elevation, a few inches from the bottom edge of the ceiling section of the unit. As such, these exact measurements are ascertained before the tub and shower faucet is prefabricated on site with half-inch copper, subsequently mounted to the wall framing adjacent the shower head end of the tub-surround unit. The appropriate holes are then pre-drilled through the fiberglass of the unit before the unit is set into position, using auger bit sizes needed for each required hole. A hole centered along the ceiling of the unit is also created for a pre-wired LED slim, that will illuminate the stall beautifully. The pre-soldered copper faucet and head with tub spout array is mounted to the wall framing to align with the holes drilled through the unit, which in themselves are in alignment with the tub drain and overflow.
Photos by Marc LaBossiere / Winnipeg Free Press
The tub and overflow are mounted before the unit is assembled, and the holes for the faucet array are pre-drilled before the unit is positioned.
Before moving the unit into position, the water feeds are tested to ensure there are no leaks. Vertical mounts using 2×3 lumber are also affixed to the existing wall framing, carefully inset to ensure that once the unit is secured to the mounts, the new perimeter drywall will be flush with the existing walls. The placement process can be arduous, and patience is key. As the tub surround unit is slowly crept backwards into the cavity until the tub drain clears the sub-floor cut-away for the trap, and the unit drops into position. The alignment of the faucet, shower head and tub spout are verified once the unit is in place. Although there is limited access to the water feeds and drain within a closet adjacent the tub/shower cavity, it soon became apparent that the trap tie-in is best achieved from below, through a temporary access along the ceiling of the floor below. The ABS drain was fitted to the tub drain, and duly tied-in to the existing drainage plumbing. The decorative faucet was installed, along with the tub spout and shower head. With all elements of the tub surround in place, the tub drain was tested by first halting the water from draining (to ensure no leaks from the drain mounted to the tub), and then allowed to drain fully to test the integrity of the trap installation and tie-in to the existing ABS. Once the system proved fully operational and leak-free, the temporary “below the tub” ceiling access was patched, and the unit was ready to be formally secured to the newly introduced 2×3 wall mounts.
Although the tub surround is rigid, and rests firmly level on the sub-floor within the cavity inset, the unit must also be fastened along the vertical flange at each end of the unit to prevent any nominal swaying of the unit when in use. Furthermore, framing along the top of the unit and the bathroom ceiling is introduced to fill the gap, a flush bulkhead with the adjacent wall to which the upper section’s valance can also be fastened. With the unit secured and all functionality tested, the final steps will include the required drywall along the sides of the unit, as well as bulkhead area. Once the drywall has been tapped and mudded, sanded and painted, all seams along the drywall edges will then receive a caulk/silicone to prevent moisture from breaching the space unwantedly. A thicker bead of silicone is used along the bottom edge of the tub, to eliminate water-breach along the floor tile.
I’ve said it before, and I’ll say it again — pre-planning and exact measurements are crucial to the success of any project. When installing a tub surround however, this adage becomes truly imperative. Once a hole is drilled through the fiberglass, there’s no going back! Moreover, having to remove the unit from the inset cavity after it drops into position, because a step was missed or the copper faucet array is misaligned, is the stuff that keeps me up at night. That’s why measurements were double and triple-checked every step of the way. It was a big relief once this unit was fully installed — the finishing touches should be a breeze.
RenoBoss.Inc@outlook.com

A bulkhead is framed above the unit to fill the gap between the upper section of the tub surround and the bathroom ceiling.

Once the tub section has been levelled in the cavity, it is removed so that the entire unit can be pre-assembled before being placed.