

Ace that base
Advertisement
Read this article for free:
or
Already have an account? Log in here »
To continue reading, please subscribe:

Digital Subscription
One year of digital access for only $205*
- Enjoy unlimited reading on winnipegfreepress.com
- Read the E-Edition, our digital replica newspaper
- Access News Break, our award-winning app
- Play interactive puzzles
*First annual payment billed as $205.00 + GST for one year. This annual subscription will automatically renew at $233.00 + GST every 52 weeks (10% off the regular annual price of $259.35). Offer available to new and qualified returning subscribers only. Cancel any time.
To continue reading, please subscribe:
Add Free Press access to your Brandon Sun subscription for only an additional
$1 for the first 4 weeks*
- Enjoy unlimited reading on winnipegfreepress.com
- Read the E-Edition, our digital replica newspaper
- Access News Break, our award-winning app
- Play interactive puzzles
*Your next Brandon Sun subscription payment will increase by $1.00 and you will be charged $17.95 plus GST for four weeks. After four weeks, your payment will increase to $24.95 plus GST every four weeks.
Read unlimited articles for free today:
or
Already have an account? Log in here »
Hey there, time traveller!
This article was published 01/02/2025 (532 days ago), so information in it may no longer be current.
Although pre-fab shower bases are available in many standard sizes, they don’t often provide the custom look desired by homeowners, especially if the entire shower stall is meant to be tiled.
Moreover, most pre-fab base sizes don’t cater well to custom shower sizes, when the primary objective is to maximize available space. As such, a custom base can be created, and subsequently tiled to complement the shower stall’s walls.
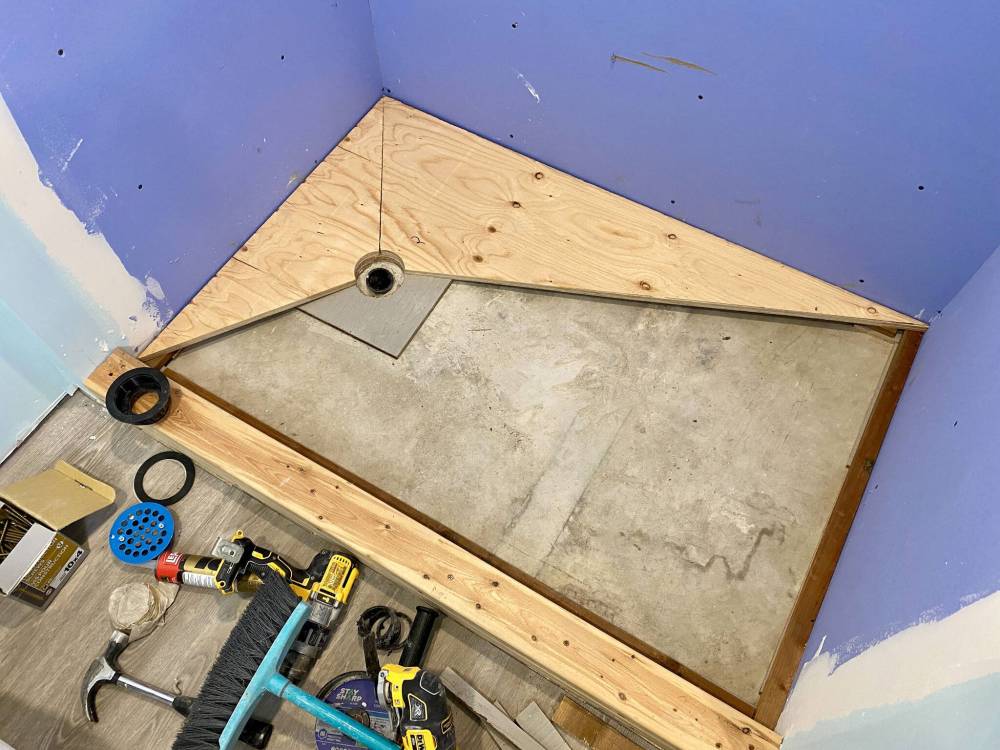
Once the two-inch ABS drain location has been established, and the depth of the shower base is mapped, a curb is created using three stacked lengths of two-by-two lumber. This will eventually become the edge that contains water hitting the base while the shower is in use
MARC LABOSSIERE / FREE PRESS
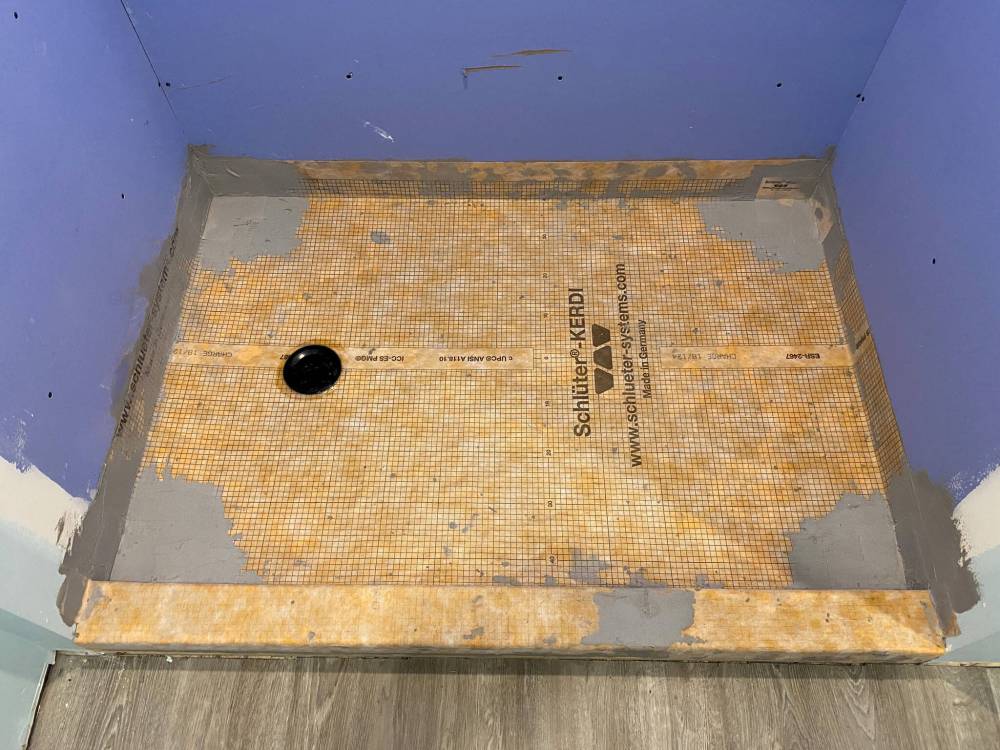
The shower base (above) is fitted with waterproof cloth and glued to the sloped plywood base below. Pie-shaped plywood pieces (right) introduce a slope toward the drain.
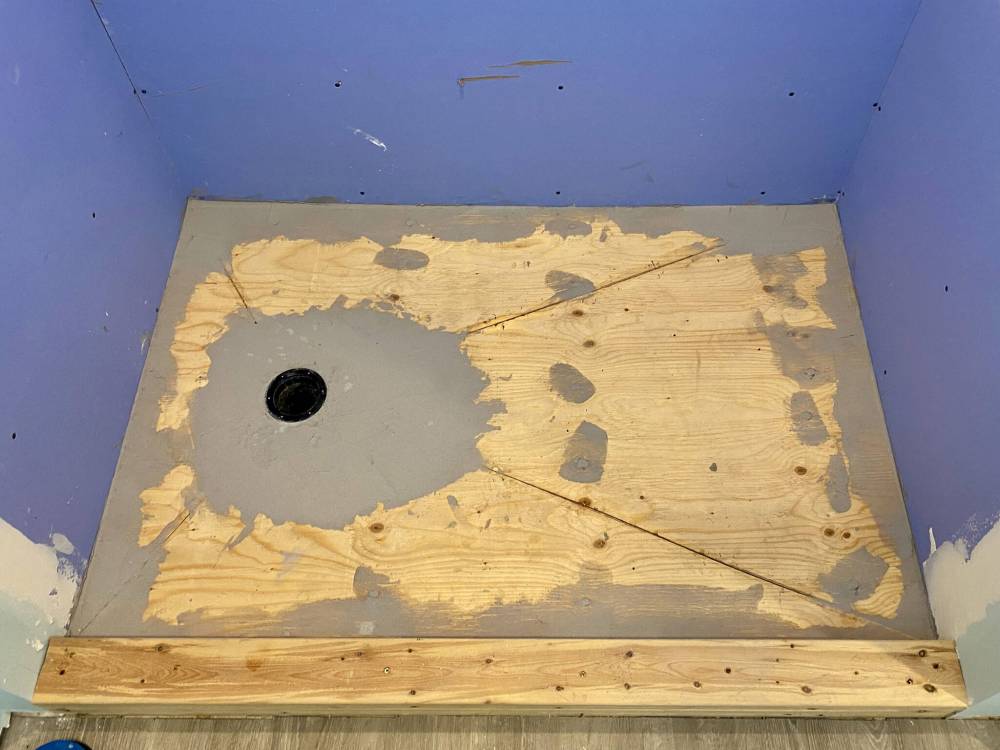
With the curb firmly secured to the sub-floor, the inside area measurement of the base is used to cut the shower base from three-quarter-inch plywood. A three-inch hole is then drilled precisely above the ABS drain location. After confirming proper alignment, diagonal cuts are made from the drain hole to each corner of the plywood base, creating four separate pie-shaped pieces, which will allow for the proper slope of the entire base towards the drain.
Next, a one-and-a-half-inch perimeter is introduced along the inner walls of the base location, including the curb, using two-by-twos fastened to the existing sub-floor. This creates the necessary slope that compels water to flow toward the drain.
After temporarily fitting all four pie-shaped pieces of the plywood base to ensure the slope is adequate, secondary supports are then added at the midway-point of the pie pieces to increase support below the entire shower base. Once the extra supports are fastened to the sub-floor, quick-set concrete is used to fill the voids between the midway and perimeter supports.
The four pie-shaped pieces are then carefully placed to ensure the pre-drilled hole is centred with the ABS drain location. Stainless-steel screws are then used to secure the ply to the supports below, and all visible seams at the plywood base cuts and along the perimeter are sealed using an adhesive silicone.
The next stage entails a few steps and specific materials. Before the tiling can begin, the entire base must be waterproofed. This is achieved using Schluter waterproofing cloth, which also includes inside corners where the base meets all three walls and the curb. The cloth is initially cut six inches longer on all sides, in the rectangular shape of the shower base. The corners are then cut in a manner that allows for a single fold (much like wrapping a gift, in reverse).
MARC LABOSSIERE / FREE PRESS
Before applying the waterproof cloth, the seams and imperfections are smoothed out using quick-set thinset.
Once the cloth has been prepped, quick-set thinset adhesive is spread evenly along the top of the base, covering it entirely. The cloth is then placed atop, properly centred and a trowel is used to press the cloth thoroughly onto the adhesive until all areas are smooth.
The inside corners are then done in much the same manner, ensuring a top overlap to direct any hint of water from reaching the inside cut of the cloth below. These preventative steps are necessary, as they greatly decrease the risk of a leak through the base, should water ever find its way past the eventual tile and grout.
Once the thinset has fully dried, the base is ready for tiling and the subsequent application of resin-based grouting, which in itself will provide initial defence against water breach.
Although this custom base method is typically used for square and rectangular base applications, I have also had opportunity to create five- and six-sided shower bases, whereby the inner walls were subjected to an angle.
Although the process was moderately more complex, the basic principles remain the same — the objective is always to ensure the base is completely resistant to moisture breach, while adequately directing water toward the drain. Moreover, decorative tiling of a custom shower base boosts visual appeal, complementing the tiled shower walls for optimal homeowner satisfaction.

MARC LABOSSIERE / FREE PRESS
Once all base pieces are secured, the cuts and perimeter seams are sealed using a silicone adhesive.
RenoBoss.Inc@outlook.com
MARC LABOSSIERE / FREE PRESS
Pie-shaped plywood pieces are cut to introduce a slope towards the ABS drain location.