

Making windows disappear
Project is prep for a fabulous feature wall
Advertisement
Read this article for free:
or
Already have an account? Log in here »
To continue reading, please subscribe:
Monthly Digital Subscription
$0 for the first 4 weeks*
- Enjoy unlimited reading on winnipegfreepress.com
- Read the E-Edition, our digital replica newspaper
- Access News Break, our award-winning app
- Play interactive puzzles
*No charge for 4 weeks then price increases to the regular rate of $19.00 plus GST every four weeks. Offer available to new and qualified returning subscribers only. Cancel any time.
Monthly Digital Subscription
$4.75/week*
- Enjoy unlimited reading on winnipegfreepress.com
- Read the E-Edition, our digital replica newspaper
- Access News Break, our award-winning app
- Play interactive puzzles
*Billed as $19 plus GST every four weeks. Cancel any time.
To continue reading, please subscribe:
Add Free Press access to your Brandon Sun subscription for only an additional
$1 for the first 4 weeks*
*Your next subscription payment will increase by $1.00 and you will be charged $16.99 plus GST for four weeks. After four weeks, your payment will increase to $23.99 plus GST every four weeks.
Read unlimited articles for free today:
or
Already have an account? Log in here »
It’s often the least sexy tasks during remodelling that prove to be the most important, but they tend to be overshadowed by the grandeur of a completed project. We’re talking the rough plumbing of a bathroom upgrade, the electrical required for the introduction of ceiling pot lights or building the sub-structure that supports a multi-tiered deck.
At a recent jobsite, it was phase one of a feature wall introduction that fell into the least sexy category.
The completed feature wall will be the showpiece of the home — an 18-foot-wide wall with a vaulted ceiling, including a floor-to-ceiling stack in decorative stone encasing a wall-mount fireplace, flat-screen TV and a wood-stained mantle, with cabinetry on either side.
Marc LaBossiere photos / Free Press
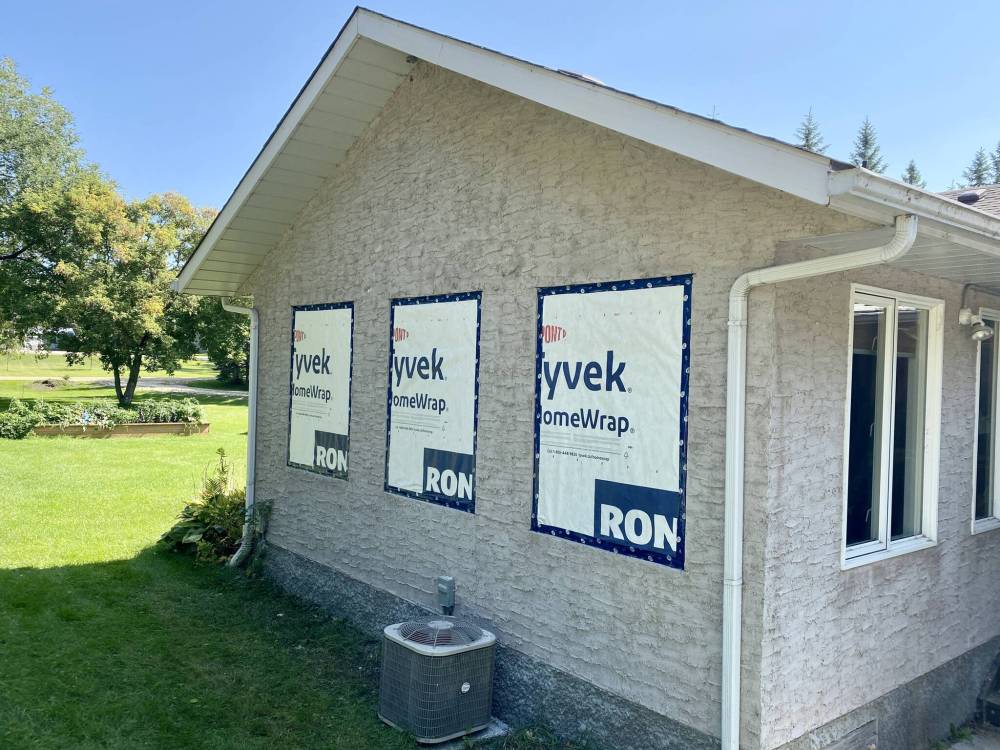
Outside, the three former window openings are covered in Tyvek and sealed with Tuck tape to protect against the weather.
Typically, a project like this would start with design layout to determine the exact measurements required to frame the centre stack, as well as the dimensions and elevations for the cabinetry and shelving on each side of the stack.
In this instance, however, an important first step was required: the removal of the existing three windows on that wall.
The space was an addition to the original footprint of the house, intended as a four-season room with plenty of sunlight. After purchasing the house a short while ago, though, the new homeowners realized that the extension — which had windows on each of the three exterior walls — never really felt like part of the house.
After much discussion, it was decided that with the introduction of a decorative area that includes a fireplace, TV and cabinetry, this gable wall with vaulted ceiling could become the focal point of the home.
Because the window style includes a nailing fin (which remains tucked behind the existing stucco), removing the three windows required several steps. From the interior, the casings were removed, exposing the window frame and the rough framing of the studs. The insulation tucked into the gap was removed and discarded.

Inside, before the drywall was installed, the frame cavities were filled with insulation and covered in vapour barrier.
After verifying that there were no side fasteners through the window frame and into the adjacent studs, my focus shifted to the exterior. The nailing fin tucked behind the stucco meant there was no way to keep the windows’ frames, or brickmoulds, intact. The homeowners accepted the fact that the windows might not be salvaged, which allowed me to come up with an efficient way to remove them.
Using a circular saw with a metal grinder blade, a cutline was made along all front surfaces of the brickmould, roughly half-an-inch from the outside perimeter of each window, deep enough to penetrate the full frame past the nailing fin. This approach freed each window for removal, without disturbing any of the stucco, which could easily have been damaged by the weight of the windows once they were dislodged.
Each window was cut out from the brickmould and carefully hoisted out of position. With the opening now empty, the remaining half inch of brickmould was cut out using the same saw blade. The empty window openings were then framed using 2 x 4 lumber, and sheathed with half-inch oriented strand board (OSB). The exterior sheeting was covered with Tyvek, sealed along all joints using blue Tuck tape to protect against the weather until the homeowners decide how they’d like to decoratively finish the closed-in window openings.
On the inside, the exposed framing was filled with insulation, covered with six mil vapour barrier and sealed along all seams using Tuck tape. Half-inch drywall was installed, and every seam was taped and mudded. After several coats of finishing mud, the three areas were then sanded, primed and painted to match the existing wall.
Fortunately, filling in a window opening is often much easier than introducing a new window; the empty void where a window used to be can simply be framed and sheeted, whereas creating an opening for a new window requires the introduction of a lintel — an invasive approach that ties into the existing framing of the house.

The gable wall with vaulted ceiling is now ready for the entertainment centre/fireplace project.
At our jobsite, with the three windows gone and the wall ready for the next phase, the homeowners’ dream of having a beautiful feature wall is that much closer to coming true.